What is data modeling?
Data modeling is creating relationships between multiple tables of data. But, how you model your data determines the difference between easy lookup and a potential mess of mismatches.
For more details on how tables work in Honeycode, check out our Tables Overview.
Let's compare how you'd likely model data in a spreadsheet vs. in Honeycode tables. Imagine you have a couple projects, like below.

In a traditional spreadsheet...
Now, let’s add three tasks to each project. In a traditional spreadsheet application, you’d likely put them all in one table, like below.
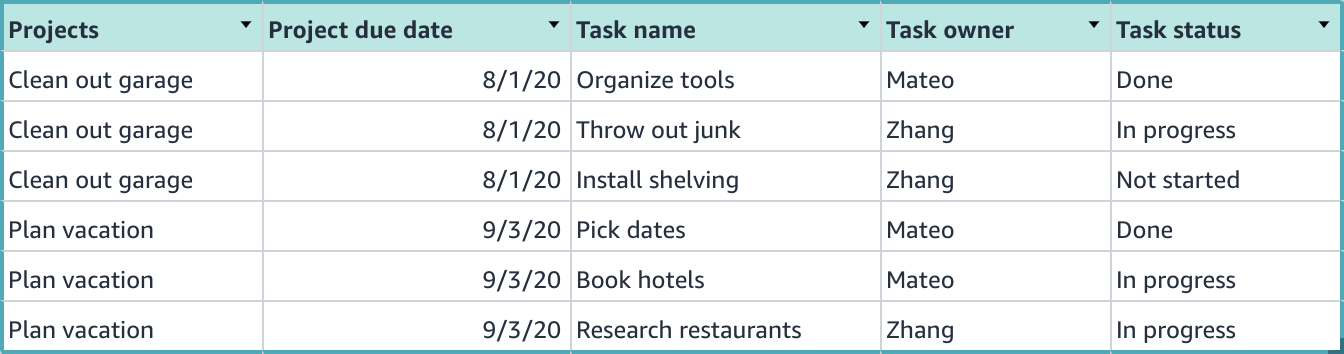
As you can see, there’s a lot of repetitive data. What if you wanted to change a project’s due date? You’d need to change it in multiple places. This not only creates more work, it increases the likelihood for error.
In Honeycode tables...
Let’s see how we would could simplify this in Honeycode using multiple tables.
We'll start by setting up a table for tasks and a separate table for projects. You can see their relationship below.
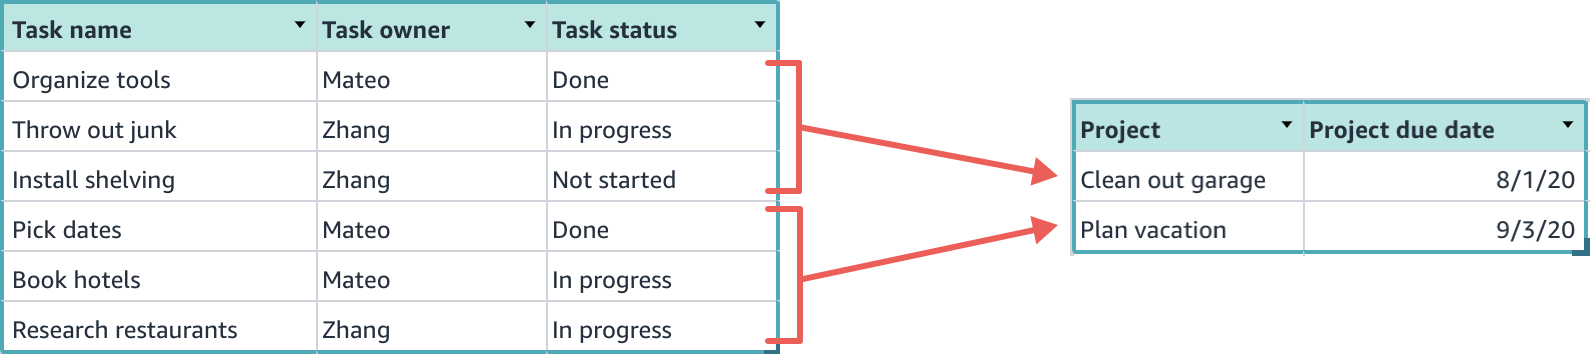
This is the essence of data modeling: Linking tables of related data together. Let’s look at the relationship from both the project’s and the task’s point of view:
Tasks-to-Project: A task can belong to only one project. In traditional data modeling this is called a many-to-one relationship.
Project-to-Tasks: A project can have many tasks. This is also known as a one-to-many relationship.
Now, let’s see how to create these relationships in Honeycode tables.
Honeycode table models
In Honeycode, table relationships are created by adding columns to a table and using rowlinks and filters to store the relationships.
Builder’s tip: A rowlink is a type of value that can store an entire row of data in a single cell. You can easily convert columns to rowlinks from the Format icon in the toolbar
Tasks-to-Project
Remember, a task can belong to only one project. In the table of tasks, add a “Project” column. Set the column’s format to be a rowlink. Then, set the rowlink’s source as the Projects table.

You can see that the Project column is now populated with blue rowlinks. Clicking on the rowlink will reveal the entire row from our table of projects.

You’ve seen how we can model the Task : Projects point of view by using a rowlink. Now, let’s look at the how we would model the Project : Tasks relationship.
Project-to-Tasks
Start by adding a column to the table of projects. This time, however, we are going to use a column filter rather than a rowlink. We’ll write the as an expression:
FILTER(Tasks, "Tasks[Projects]=THISROW()")
You can dive deeper into what this filter means in our Filters article, but conceptually it says “Look through the table of tasks and find the rows that reference this project.” You’ll see by clicking on the filter that all the related rows are shown.

A quick summary
Let’s look once more to look at the relationship between tasks and projects, and how to model them in Honeycode.
Tasks-to-Project
- A task can belong to only one project
- This represents a many-to-one data model
- To do this in Honeycode, add a column of rowlinks to the “Tasks” table
- Note: The rowlinks point to the “Project” table
Project-to-Tasks
- A project can have many tasks
- This represents a one-to-many data model
- To do this in Honeycode, add a column of filters to the “Project” table
- The filter finds and shows relevant rows in the “Tasks” table
We’ve seen how rowlinks and filters can be used together to create relationships between tables. Rowlinks are used to create relationships like, “I am related to this thing.” Filters are used to create relationships like, “These things are related to me.”
Together they form the foundation of Honeycode data modeling.
| Was this article helpful? |
|---|
- Yes
- No
0 voters