In this article you’ll learn how to add conditions to your automations and how to run an automation only on specific rows using run options.
A quick summary
Automations have three basic parts:
- A trigger determines when an automation should start
- A condition determines if and where the automation should run (optional)
- An action determines what Honeycode should do
Run options are where you configure the “if” and “where” in an automation. Adding run options can make your workflows more robust, but, as the name suggests, run options are optional. If run options are left blank, your automations will still run as expected.
Accessing run options
You can access run options from both your workbook and apps.
- For new automations, select an action from the + Add actions menu in workbook automations or app actions
- Or, open an existing action in workbook automations or app actions
There, you’ll see an accordion that will open the run options menu.

Open the run options and you’ll find two input fields.
- Run step if this condition is met determines if an automation will run
- Run step for these rows determines where your automations will run
Terms to know
Before we go further, there are a couple terms it’s helpful to know when building automation workflows.
Triggering row
The row that triggers the start of an automation.
- In tables, the triggering row is the row that starts an automation.
- In apps, there is no triggering row because the trigger is always a user interaction.
Context row
Whatever the function THISROW() returns in a given moment is the context row.
- In table automations, the context row is generally the triggering row—but not always. Sometimes the context row is a row specified in run options (more on that to come).
- In app automations, the context row is the row being viewed, added, or updated by the app user.
Builder tip: The concept of context row doesn’t apply to the cell changes trigger in table automations, because the trigger is a single cell.
Adding a condition
There are times when you may want an action to run only if a certain condition is met. You can do this for any action:
- Notify
- Add a row
- Delete a row
- Overwrite
- Update or insert row
You can think of this as adding an IF statement to your actions to run only when the condition is met. If left blank, the action is run by default.

Example
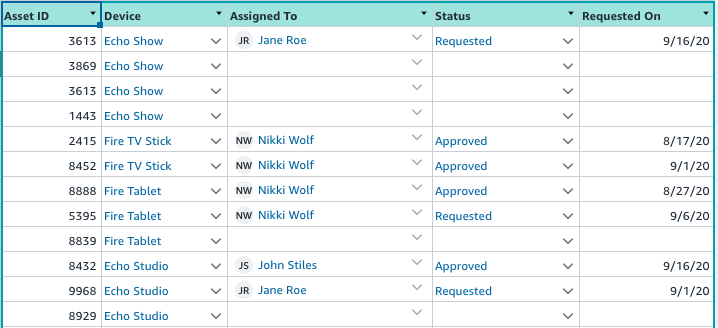
Consider the example of an PO order (refer to PO order template for more details). Below is the A_PO table which stores all the orders submitted for different projects.

The A_POs Status column values are rowlinks coming from the M_Status table:

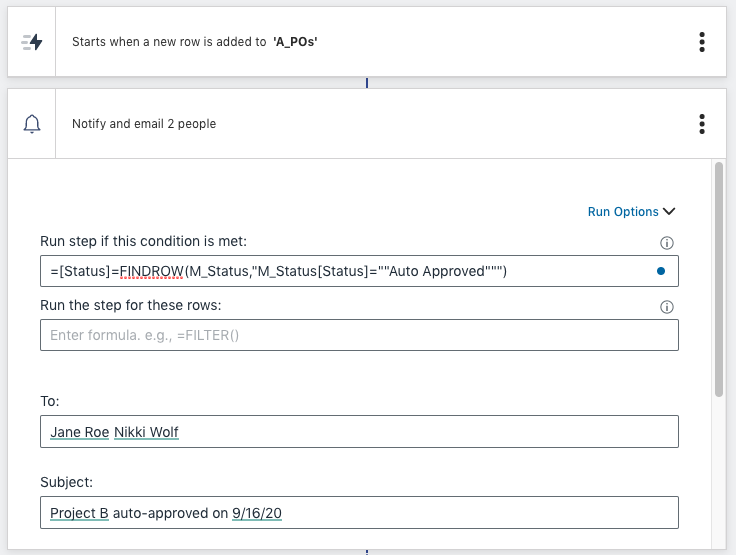
If every time a new order for a project is placed with an auto-approved status, you want to notify the submitter as well as yourself, below is how your automation should look:


Specifying rows
By default, actions are run on the triggering row unless specified otherwise. When you want to run an action on a specific row, or set of rows, you can enter a formula in the “Run the step for these rows” field in run options.

If the formula returns a set of rows, the step will be run for each row returned by the formula.
Example
Let’s say you are an IT resource manager and you are tracking the status of device orders by category. Your table data might be organized like so:

- Table named Devices
- Column named Category for device name/type
- Column named Status with green, yellow, and red to indicate availability
- Column named Stakeholders of contacts associated with device order workflow
When an order’s status column is “Red,” an email notification is sent to anyone in the stakeholders column for that device.
However, maybe you only want to notify stakeholders for orders related to the Echo device. You can do this in run options.
- Add an automation to be triggered when the status column changes in the devices table.
- Then, add a notify action. In the “To” field, enter
=[Stakeholder]to indicate contacts in the stakeholder column - In the notify action, open run options.
- For the
IFcondition, enter the formula=[Status]="RED" - Then, in the “Run step for these rows” field, use the formula
=FILTER(Devices,"Devices[Category]=%", "Echo")
IF a status in the status column is red, THEN the notify action will run for each row that meets the filter condition.
Breaking down the FILTER() formula a bit more, this formula will run the notify action once for each row returned by the condition—in this case emailing the stakeholder in Echo row of the Devices table.
Example 2
Consider the example of inventory management. Every time a new row is added to the Devices table below, you want to add a corresponding line item in the Inventory table only if the Device is an Echo Dot.

This is how your automation will look:

| Was this article helpful? |
|---|
- Yes
- No
0 voters