This article (F.K.A. Writing Efficient Filters) is for those that have an understanding of Honeycode functions and formula syntax that want to learn more about writing them to optimize performance.
For an introduction to function and formula syntax, check out our training course and this article.
Optimizing Performance
The following are four areas within Honeycode that can help optimize performance. These also serve as the four main categories within this article.
- Writing
FILTER(),FINDROW(), andFINDLASTROW()formulas efficiently - Building automations to run the
NOW()andTODAY()functions that align with your business need - Identifying your application type: Write heavy vs. Read heavy
- Establishing a Data Model
FILTER(), FINDROW(), FINDLASTROW()
Builder tip: While the following content focuses on
FILTER()formulas, the same practices can be applied toFINDROW()andFINDLASTROW().
Critical factors impacting performance of formulas
To achieve high performance formulas we will breakdown several factors and recommendations in a Do’s and Don’ts format with examples.
Do’s:
- Write filter formulas as specific as possible
- Nest a filter with fewer results inside of another filter
- Use the
INoperator with small data sets
Don’ts:
- Do not use table column references inside of functions
- Do not dereference the table columns.
- Do not refer to the columns in the table which is being filtered after an operator.
- Do not place
IFstatements inside of a filter formula.
Do’s
Write formulas as specific as possible
The specificity of a filter is how many table rows it returns. The more specific you get can mean the fewer rows being returned, which is optimal for the user experience.
Consider a filter formula of the following kind:
=Filter(Tasks, "ORDER BY Tasks[Due Date] DESC")
While this is a legitimate filter and will return all rows from the Tasks table in the descending order of due date, if the Tasks table is very large then it could return so many rows, which could cause friction for the end user. Typically, the user is interested only in a small subset of the table.
For instance, if we are creating a screen that shows tasks assigned just to the Finance team as opposed to the entire company, then the following may be more appropriate:
=Filter(Tasks, "Tasks[Team] = % ORDER BY Tasks[Due Date] DESC", "Finance")
This reduces the result set size from potentially tens of thousands to maybe a few dozen tasks, which your end user would likely appreciate.
Similarly, the following query is even more efficient than the previous one because it reduces the result set even further. It not only shows tasks that are just assigned to the Finance team, but it also only returns the tasks that are Open.
=Filter(Tasks, "Tasks[Team] = % AND Tasks[Status] = % ORDER BY Tasks[Due Date] DESC", "Finance", "Open")
The more precisely you specify the query criteria, the faster the filter will run due to the smaller number of rows being returned. In other words, Specificity improves the user experience.
Nest a filter with fewer results inside of another filter
Nesting a filter is when you place one filter formula inside of another. One way to think about this is like having a formula that has an inner filter and an outer filter. The inner filter should return fewer rows than the outer filter. This is because the inner filter will execute first, leaving fewer rows for the outer filter to return.
For example, let’s say we are tracking the inventory for an apparel company that makes thousands of short sleeve and long sleeve shirts that come in sizes XS to XXXL. If they want to see how many medium (M) long sleeve shirts they have available, they could use nested filters. It’s likely that a filter pulling the medium sized shirts is more specific and will return fewer rows than a filter pulling all of the long sleeve shirts across all of the sizes, so we’ll start with the medium sized shirts criteria as our inner filter formula:
Inner : =FILTER(Inventory, "Inventory[Shirt_Size] = %", "Medium")
Now let’s nest that inside of the outer filter formula:
Outer: =FILTER(FILTER(Inventory, "Inventory[Shirt_Size] = %", "Medium"), "Inventory[Shirt_Style] = %", "Long Sleeve")
The key here is the order of the filters. Whichever returns fewer rows, should be the inner formula nested inside of the outer formula.
Use the IN operator with small data sets
The IN operator is very handy in Honeycode, since it allows us to perform set membership checks. It is best used with small data sets.
First, know that the IN operator can be used outside of filters. It returns a boolean value: true or false. For example, one may write:
=$[Task] IN FILTER(Tasks, "Tasks[Priority] = %", "HIGH")
(We assume $[Task] is a variable that resolves to a row in Tasks table. )
Second, know that the IN operator can also use structured references on right hand side like this:
=$[Actor] IN Roles[Actor]
Typically, formulas with a stand alone IN operator are reasonably efficient by themselves. The second example is more efficient than the first. In the first example, the right hand side is an intermediate result that is not indexed. So, it might not be as optimal for the end user compared to the second example, where the Roles[Actor] column is indexed beforehand.
Here is an example of IN operator used inside filters:
=FILTER(Checklist, "Checklist[Main] IN $[CurrentItems]")
Efficiency of such filters depends on the number of results in $[CurrentItems]. If that result set is small (i.e., a few hundred), the filter should be efficient for your end user.
Don’ts
Do not use table column references inside of functions
It’s best to avoid referencing table columns inside of functions.
For instance, this filter example references the [Status] column inside of the ANY function:
=FILTER(ANY(Tasks[Status], “In-Progress”, “Blocked”, “Overdue”)) ![]()
A better way to write this is to remove the ANY function and instead use multiple OR clauses:
=FILTER(Tasks[Status] = "In-Progress" OR Tasks[Status] = "Blocked" OR Tasks[Status] = "Overdue") ![]()
Do not dereference the table columns
Do not dereference the table columns in a filter formula. An alternative way to do the same thing is to create a proxy column and use it in the filter instead.
For instance, this filter example is dereferencing table columns:
=FILTER(Tasks[Team][Name] = “Finance”) ![]()
If we create a proxy column for the team name called Tasks[TeamName] , we can instead use it in the filter for better performance:
=FILTER(Tasks[TeamName] = "Finance") ![]()
Do not compare columns from the same table after an operator
Do not compare columns from the table that is being filtered after an operator: =, <>, >, >=, <, <=, or IN. Things you can place after operators are: text, dates, numeric values, or functions. If you are trying to compare columns from the table that is being filtered, we recommend you create a proxy column in the table that does the comparison and then place it inside the filter.
For instance, the following filter formula is using the < operator to compare the [Estimate] and [Actual] columns, which are both from the Tasks table:
=FILTER(Tasks[Estimate] < Tasks[Actual]) ![]()
A better way to write this is to create a proxy column called [OverEstimatedEffort] in the Tasks table with the formula [Actual] - [Estimate]. You can then use this column with an operator Tasks[OverEstimatedEffort] > 0 as the filter criteria:
=FILTER(Tasks[OverEstimatedEffort] > 0) ![]()
Do not place IF statements inside of a filter
Keep IF statements outside of filters. When you place an IF statement inside a filter, we call this branching inside of the query clause. If you require this functionality then pull the branch outside of the query clause with an outer IF function wrapping around the two branches. Nested conditional logic is acceptable as long as it is outside of the query clause.
For instance, we can see the IF statement inside of the filter formula:

A better way to write this is to pull the IF statement outside of the filter formula and place it front:

TODAY() and NOW()
Use of the TODAY() and NOW() functions in a workbook may result in multiple recalculations for each transaction, causing a delay. To help ensure optimal performance, TODAY() and NOW() can be replaced with an automation that runs once daily or with a frequency that’s appropriate for your business. It can be set to update one cell or column in the workbook. After that, you can reference this value wherever TODAY() and NOW() are needed in your workbook to decrease calculation, increase performance, and enhance your team's user experience.
We'll demonstrate this using an example that executes the NOW() function in an automation. This same pattern can be used for the TODAY() function.
-
In a table, set the column properties to a date and/or time format for your needs.
-
In the first row, manually type in a time and date appropriate for your use case. Do not use the
NOW()function.

-
On the left navigation bar, click the lightning bolt > then click the [+] button to start building an automation that will update the date and time.
-
For the automation trigger, select Date & Time Reached > select the table from step 1 using the dropdown menu.
-
Select a frequency for the Date & Time (UTC) that matches your business need > click [+] Add actions > select [+] Add a row from the menu.
NOW()function in a table, Automations that trigger every few minutes can be taxing on performance; furthermore, we encourage you to select a frequency that is judicious for both your business needs and your team's user experience.

- Using the Add row to dropdown, select the table from step 1 > In the Take data from field, type
=NOW()> In the and write to field, select the column from step 2 > click [+] Add actions and select Delete row.

- In the Delete modal, select Context row > click Publish

In summary, when the first action is triggered, it will add a new row to the column with the current date and time using the NOW() function. The second action will delete the context row, meaning the previous row that contains the past date and/or time.
Having multiple instances of the NOW() or TODAY() function can decrease performance, so the data this automation continuously updates can be used throughout your tables and apps as shown in the following bonus step.
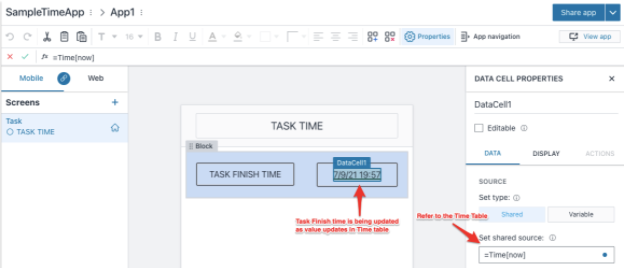
Bonus step: Whenever NOW() is required somewhere else in your tables or apps, you can reference this continuously updated row. We recommend doing this instead of creating new instances of the NOW() when avoidable to help improve performance. For example, with a data cell in your app, you could set the shared data source to reference this row. Replace the table and column in the following formula with your own: =TableName[ColumnName]
Identifying your Application Type
Your application will perform better if you identify your application type. The following types of applications are possible:
- Write Heavy Application: If you have a write-heavy application, use formulas or expressions to calculate data on the app screens > then have the calculated data write to the tables.
- Read Heavy Application: For an app that is read heavy, use formulas or expressions in tables to calculate values > then set up your screens to display the tables' calculated values.
Data Modeling
It’s always recommended that you create data models before you build an app. A good data model makes the difference between an easy lookup versus potential mismatches. Applications that use efficient data models will perform optimally.
The following are some resources to get you started with data modeling:
| Was this article helpful? |
|---|
- Yes
- No
0 voters