By: @Pinar
Today I'd like to share with you an app I developed to manage our weekly program reviews and how I used Honeycode to build it without any coding experience. I'm an engineer...but not the right kind who can write code or develop apps. Over the years I've come to work with teams that develop optimization software, Internet of Things (IOT) products, and recently in a software as a service (SaaS) product org.
While product managers, designers, and engineers work like busy bees to deliver features, I spend my time thinking on processes and automations that I can put in place to track and monitor delivery of these features effectively, efficiently, and without creating much overhead to stakeholders. I’ve been thinking about similar problems in different contexts for a while now. The key questions of my daily life are: How can I focus my team on one objective and give visibility of what is going on product? How do I make sure we deliver for our customers day in, day out by having the visibility of pain points and wins, of the teams struggling in silence, and to eventually make a data driven judgment of my own if we’ll hit our goals and deliver on time for our customers?
I’ve tried my fair share of tools in my quest to answer these questions. Remember when we updated presentation slides and sent around via email prior to weekly review meetings? How about spreadsheets with faux-Gantt charts mailed around and shared in folders, where you rely on people to update their tasks, follow the plan you diligently put together…only to sit in a meeting and listen to at least a few people surfacing that their updates haven’t been reflected. Has this ever happened to you?
The truth is no tool can be the silver bullet for teams trying to increase their productivity. The tools are merely tools, their success is measured by how flexible and customizable they are to fill in big and significant gaps in your team’s operating model, and Honeycode does a pretty good job of it.
Weekly Program Review App Overview
This app is my team’s main tool for coordinating and tracking 12 large-scale programs we set up to deliver on our yearly goals. Each of these programs has a team of 8-10 people assigned to work on different initiatives within programs and deliverables within initiatives (folding structure). I built this app to give our organization visibility, breed accountability, and quality of delivery. We execute to our roadmap using this app across an organization of 200+ people.
Note: Due to confidentiality I removed data from my app and used mock data to give you an overview.
Home Screen: Program Dashboard
This screen pulls together the key updates for all of our programs. A user visiting this screen can read through all or only programs of their choice, understand the status through the colored bar (red-yellow-green), and learn who the owners are without clicking on anything else. During my meetings, I always start with programs that are in red status; hence, I order programs per their status by first assigning a number value to each status in tables (ie. Red:1, Yellow:2 and Green:3) and ordering them by the number value column using ORDER BY.
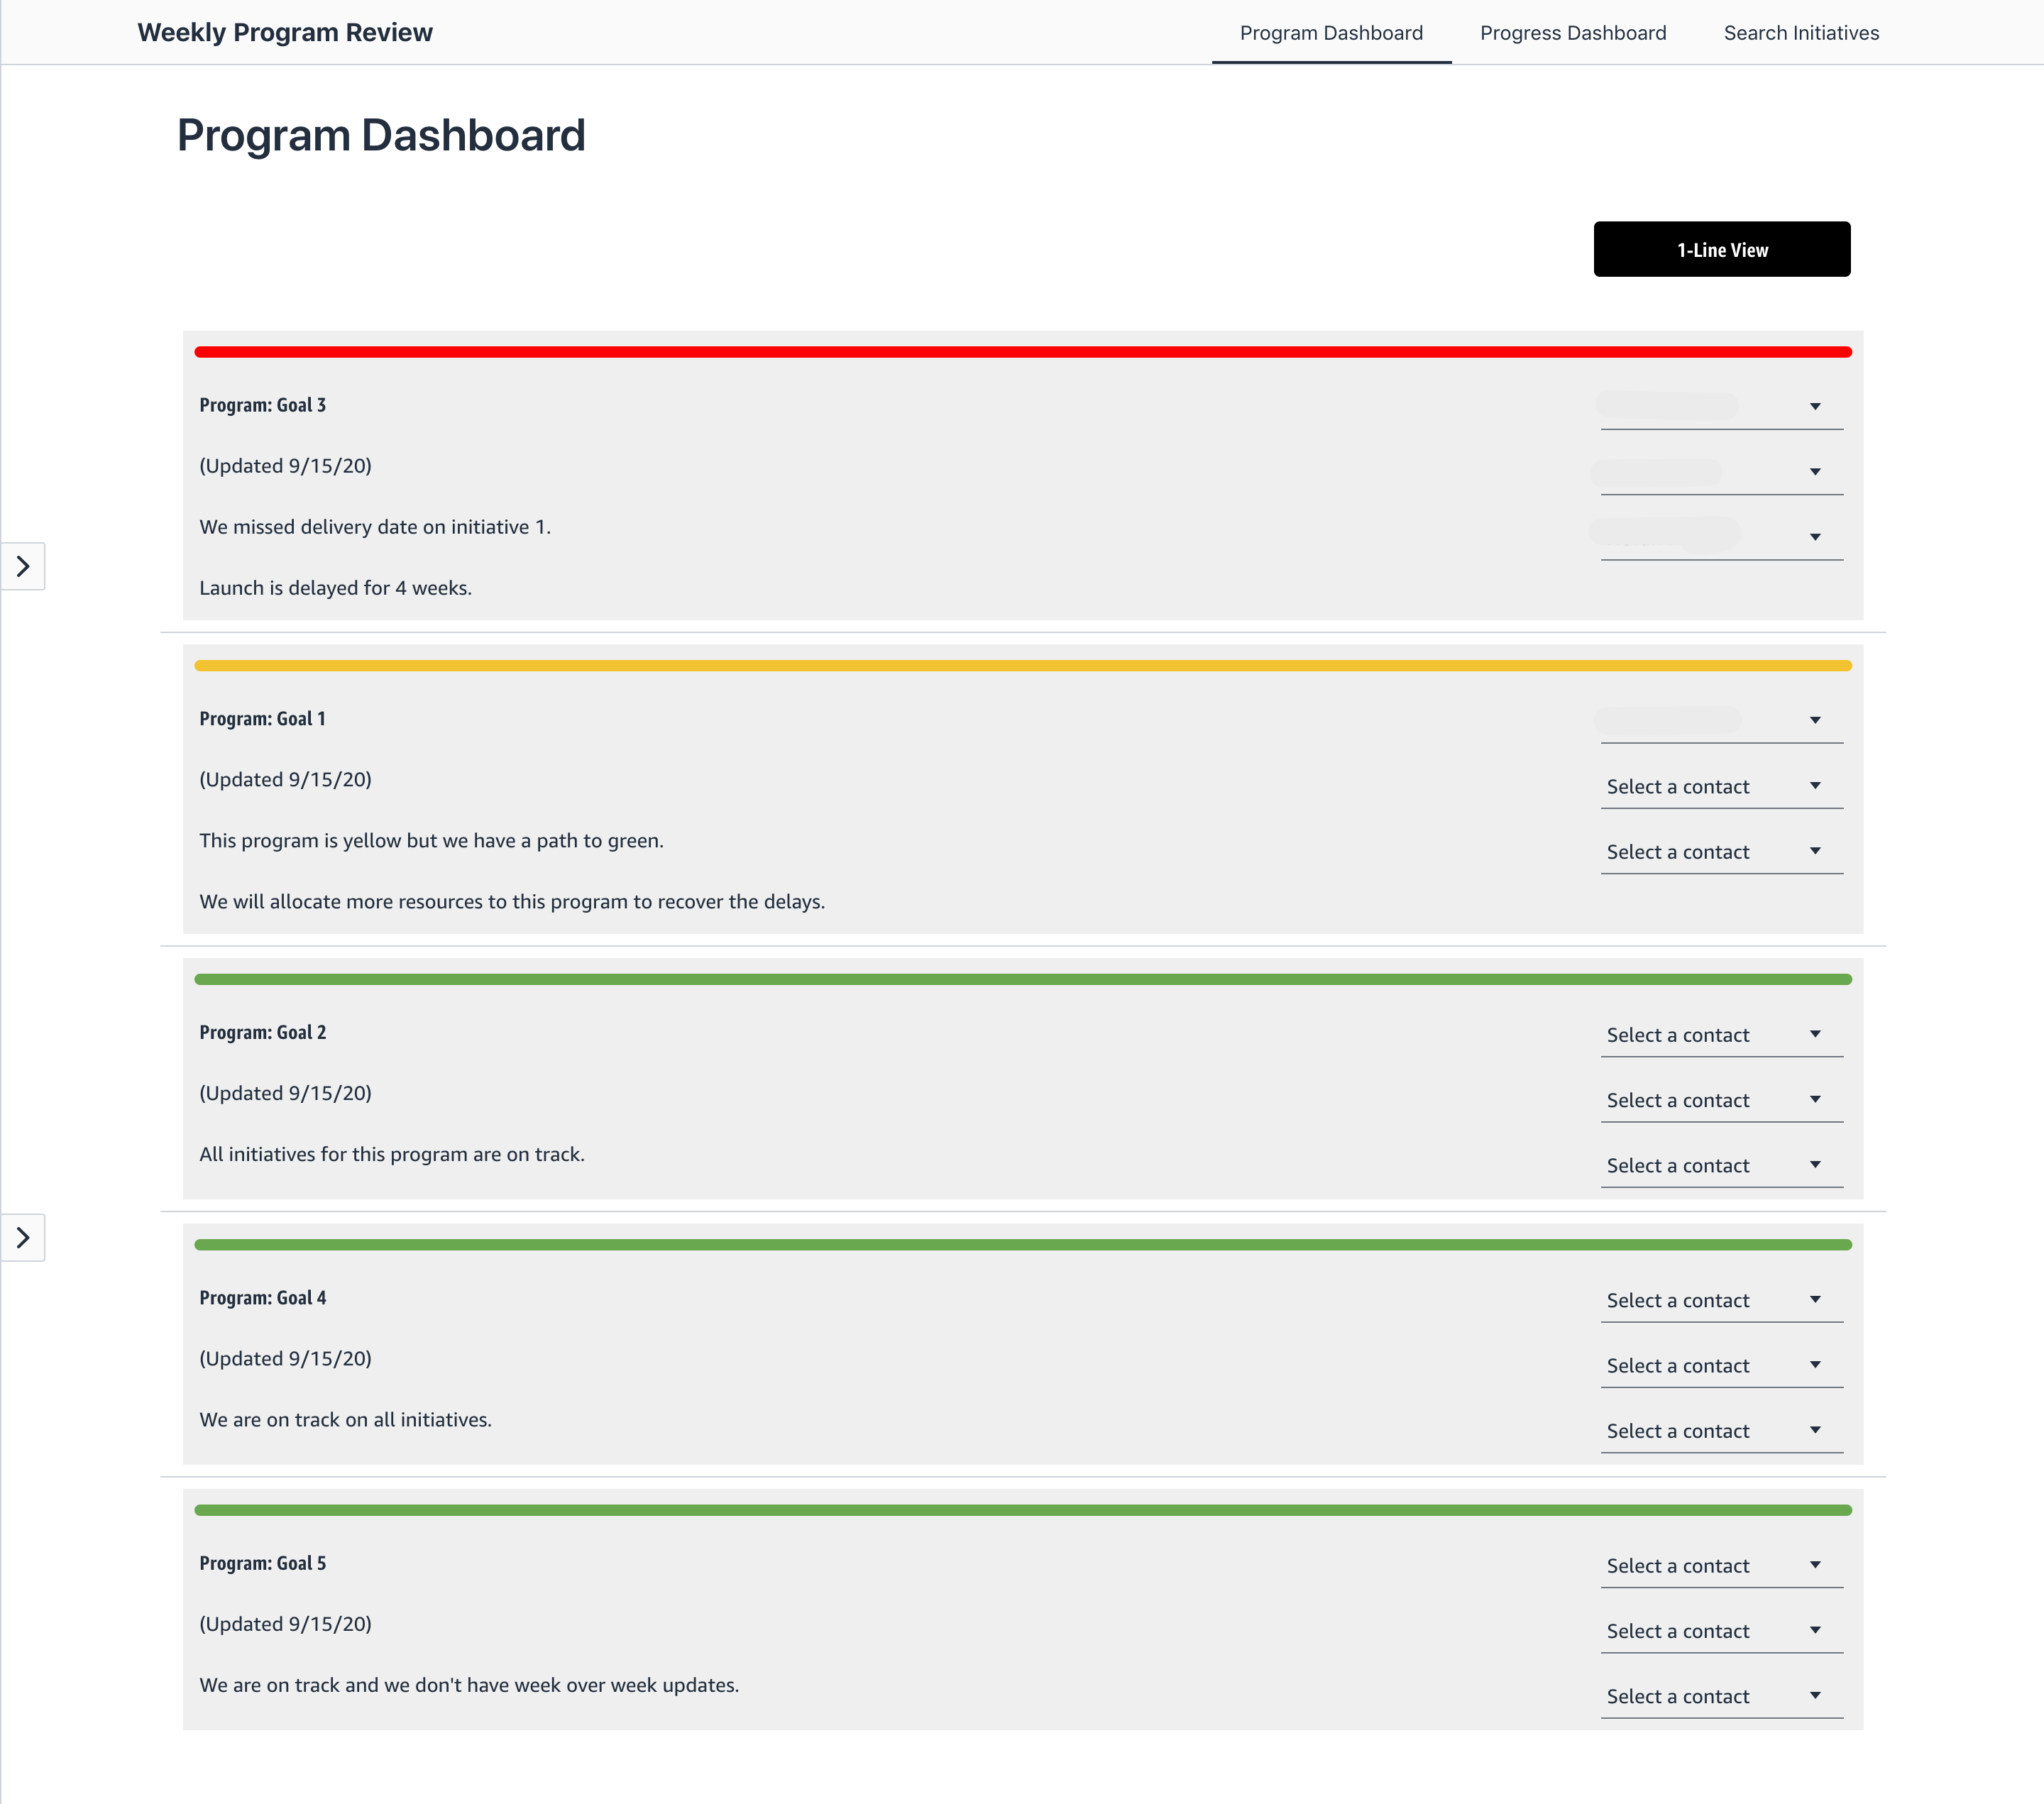
A nice feature on this page is the 1-line view button in the top corner. This button toggles between a short table view of all programs. It comes in handy when you have a long list of programs.
Detail View Screen
When a user clicks on a program, they navigate to a detail page that is loaded with Honeycode smartness. Users see all underlying initiatives for a program, are able to add updates for their initiatives, and for the overall program, can tag initiatives with different labels such as planning confidence level or whether it’s customer facing or operational deliverable. Using Honeycode, I was able to set up automations to allow people to add updates via navigating to a new screen and using a new form, I was able to custom build the labels I needed to serve the specific needs of my organization. More importantly, I was able to design it in a way that specifically caters to my organization’s needs in addition to the way I wanted it to look like.
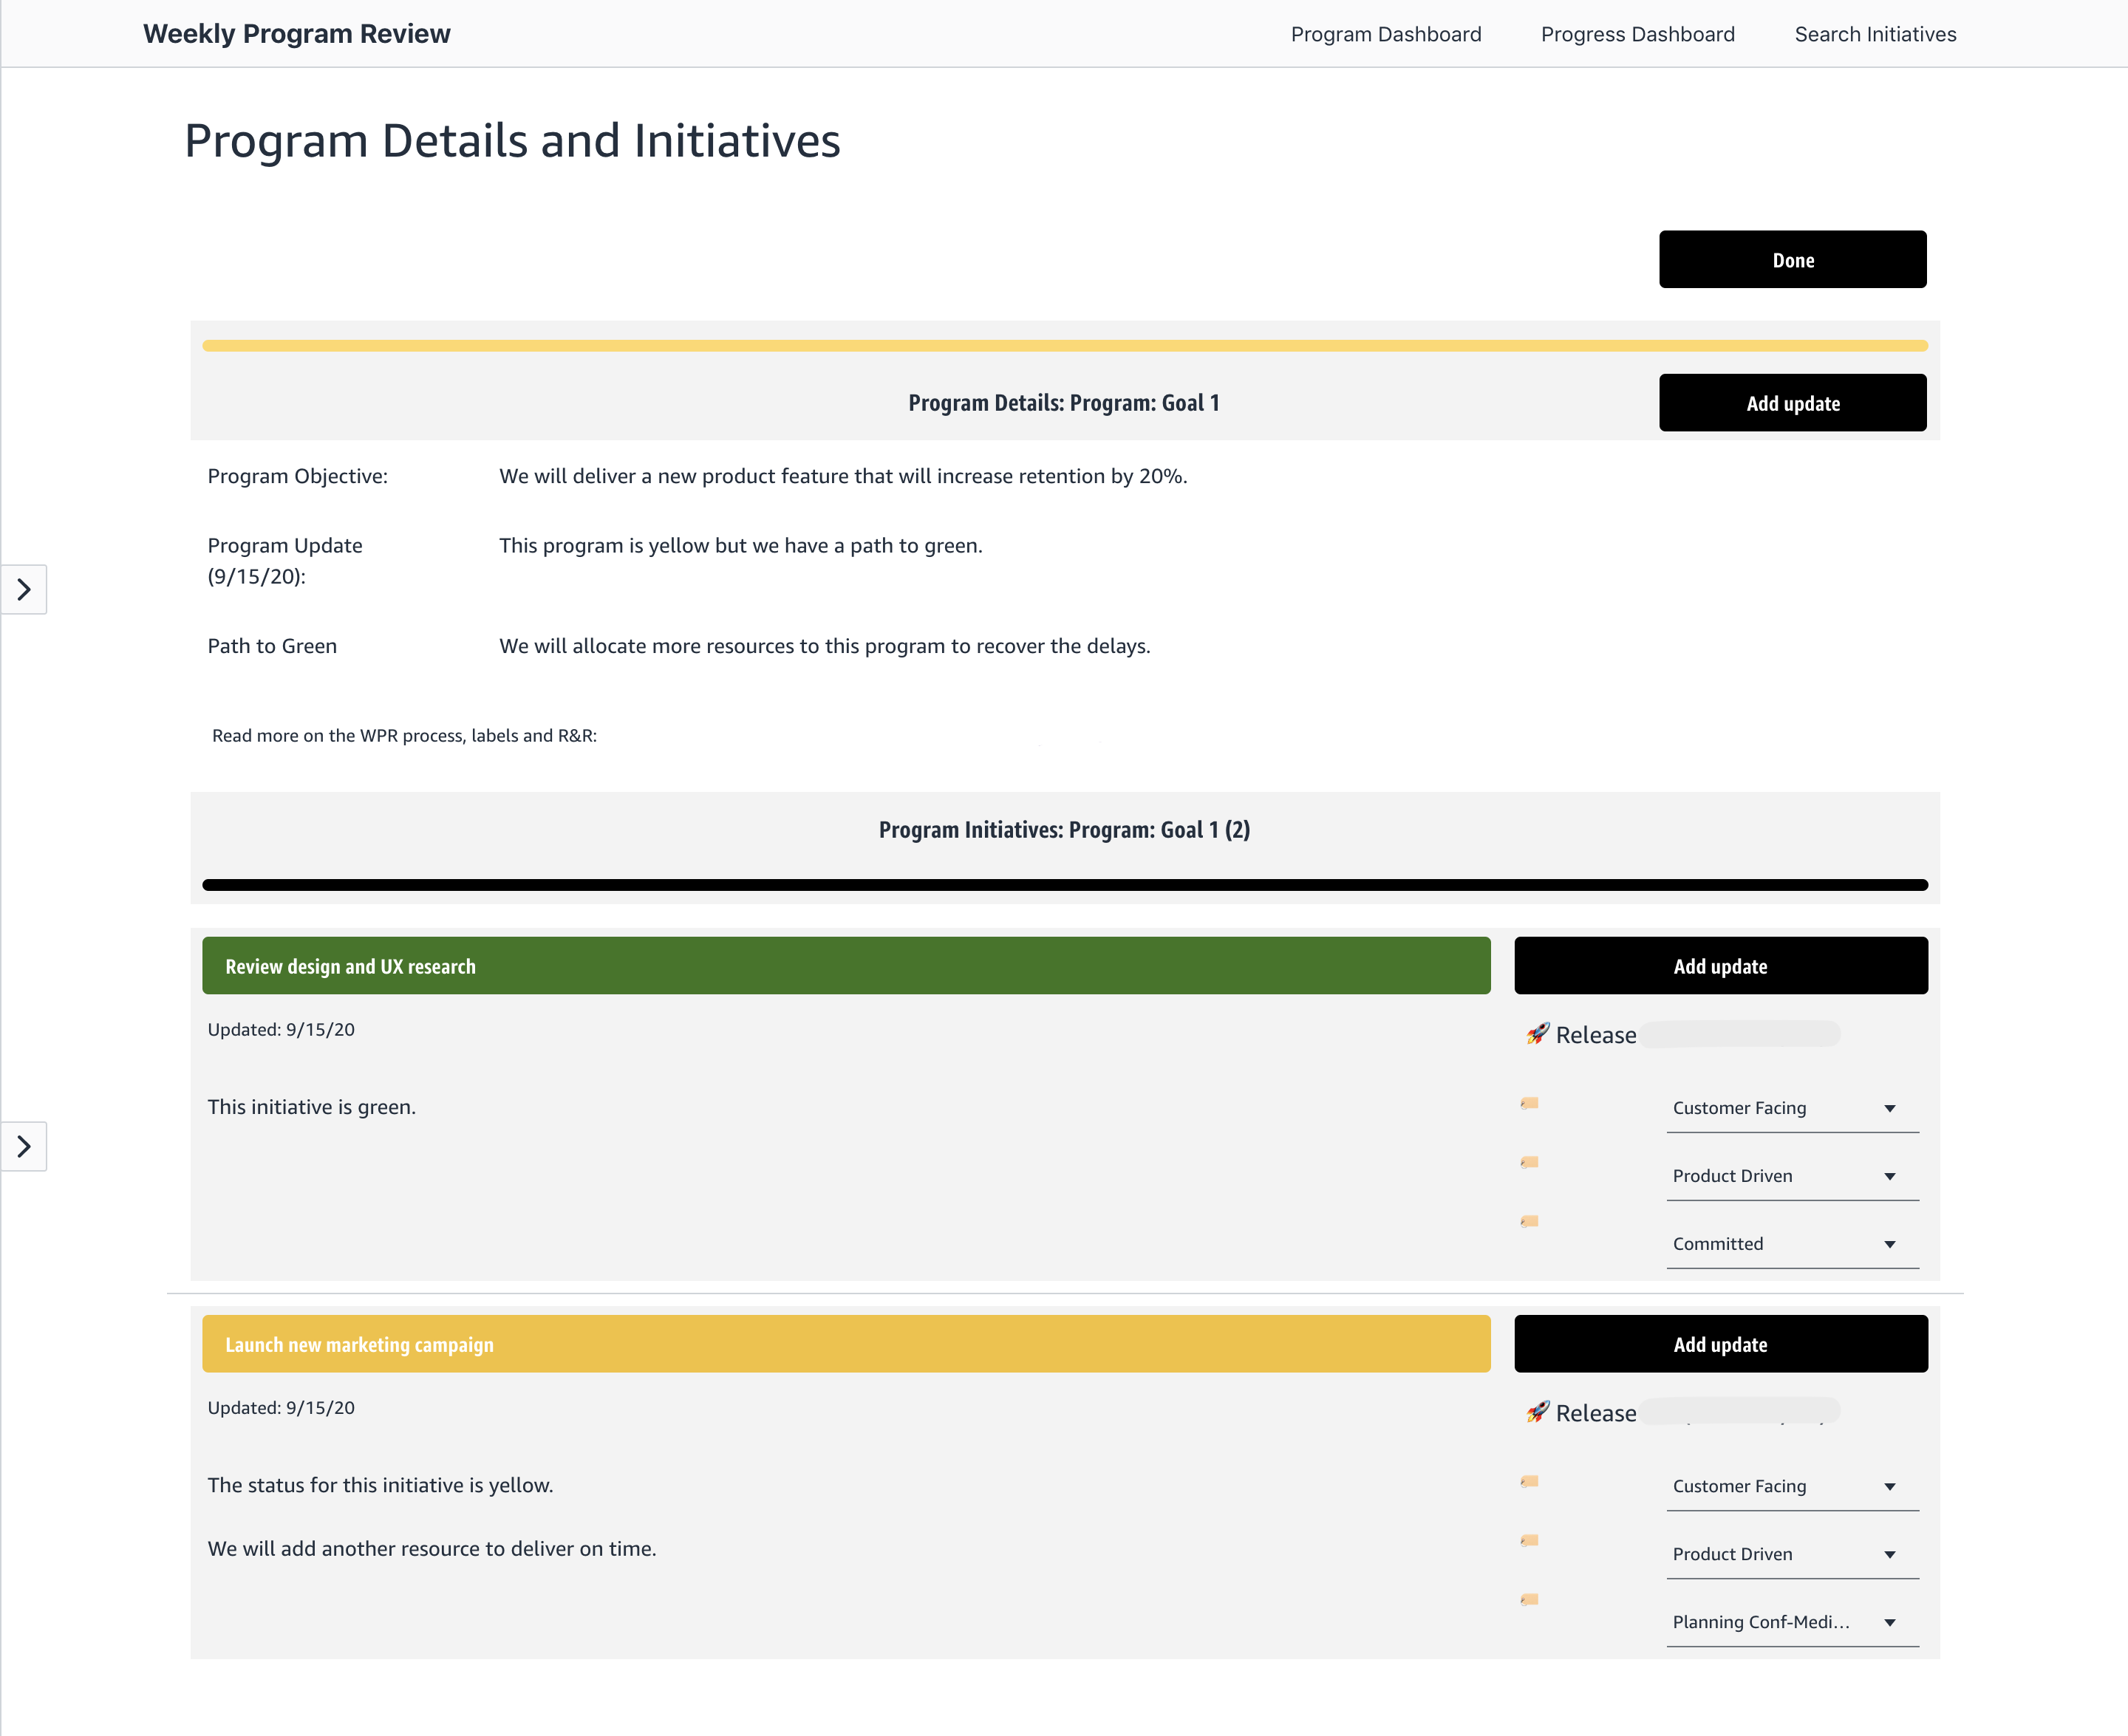
Adding Updates
For each initiative, owners write a short update on status, and if the status is yellow or red, they add a path to green. They also have their previous updates at their fingertips for easy reference. Users who have the Program Owner role don’t have to think what their program status should be. Once all initiatives are updated with red-yellow-green status, program status is calculated automatically.
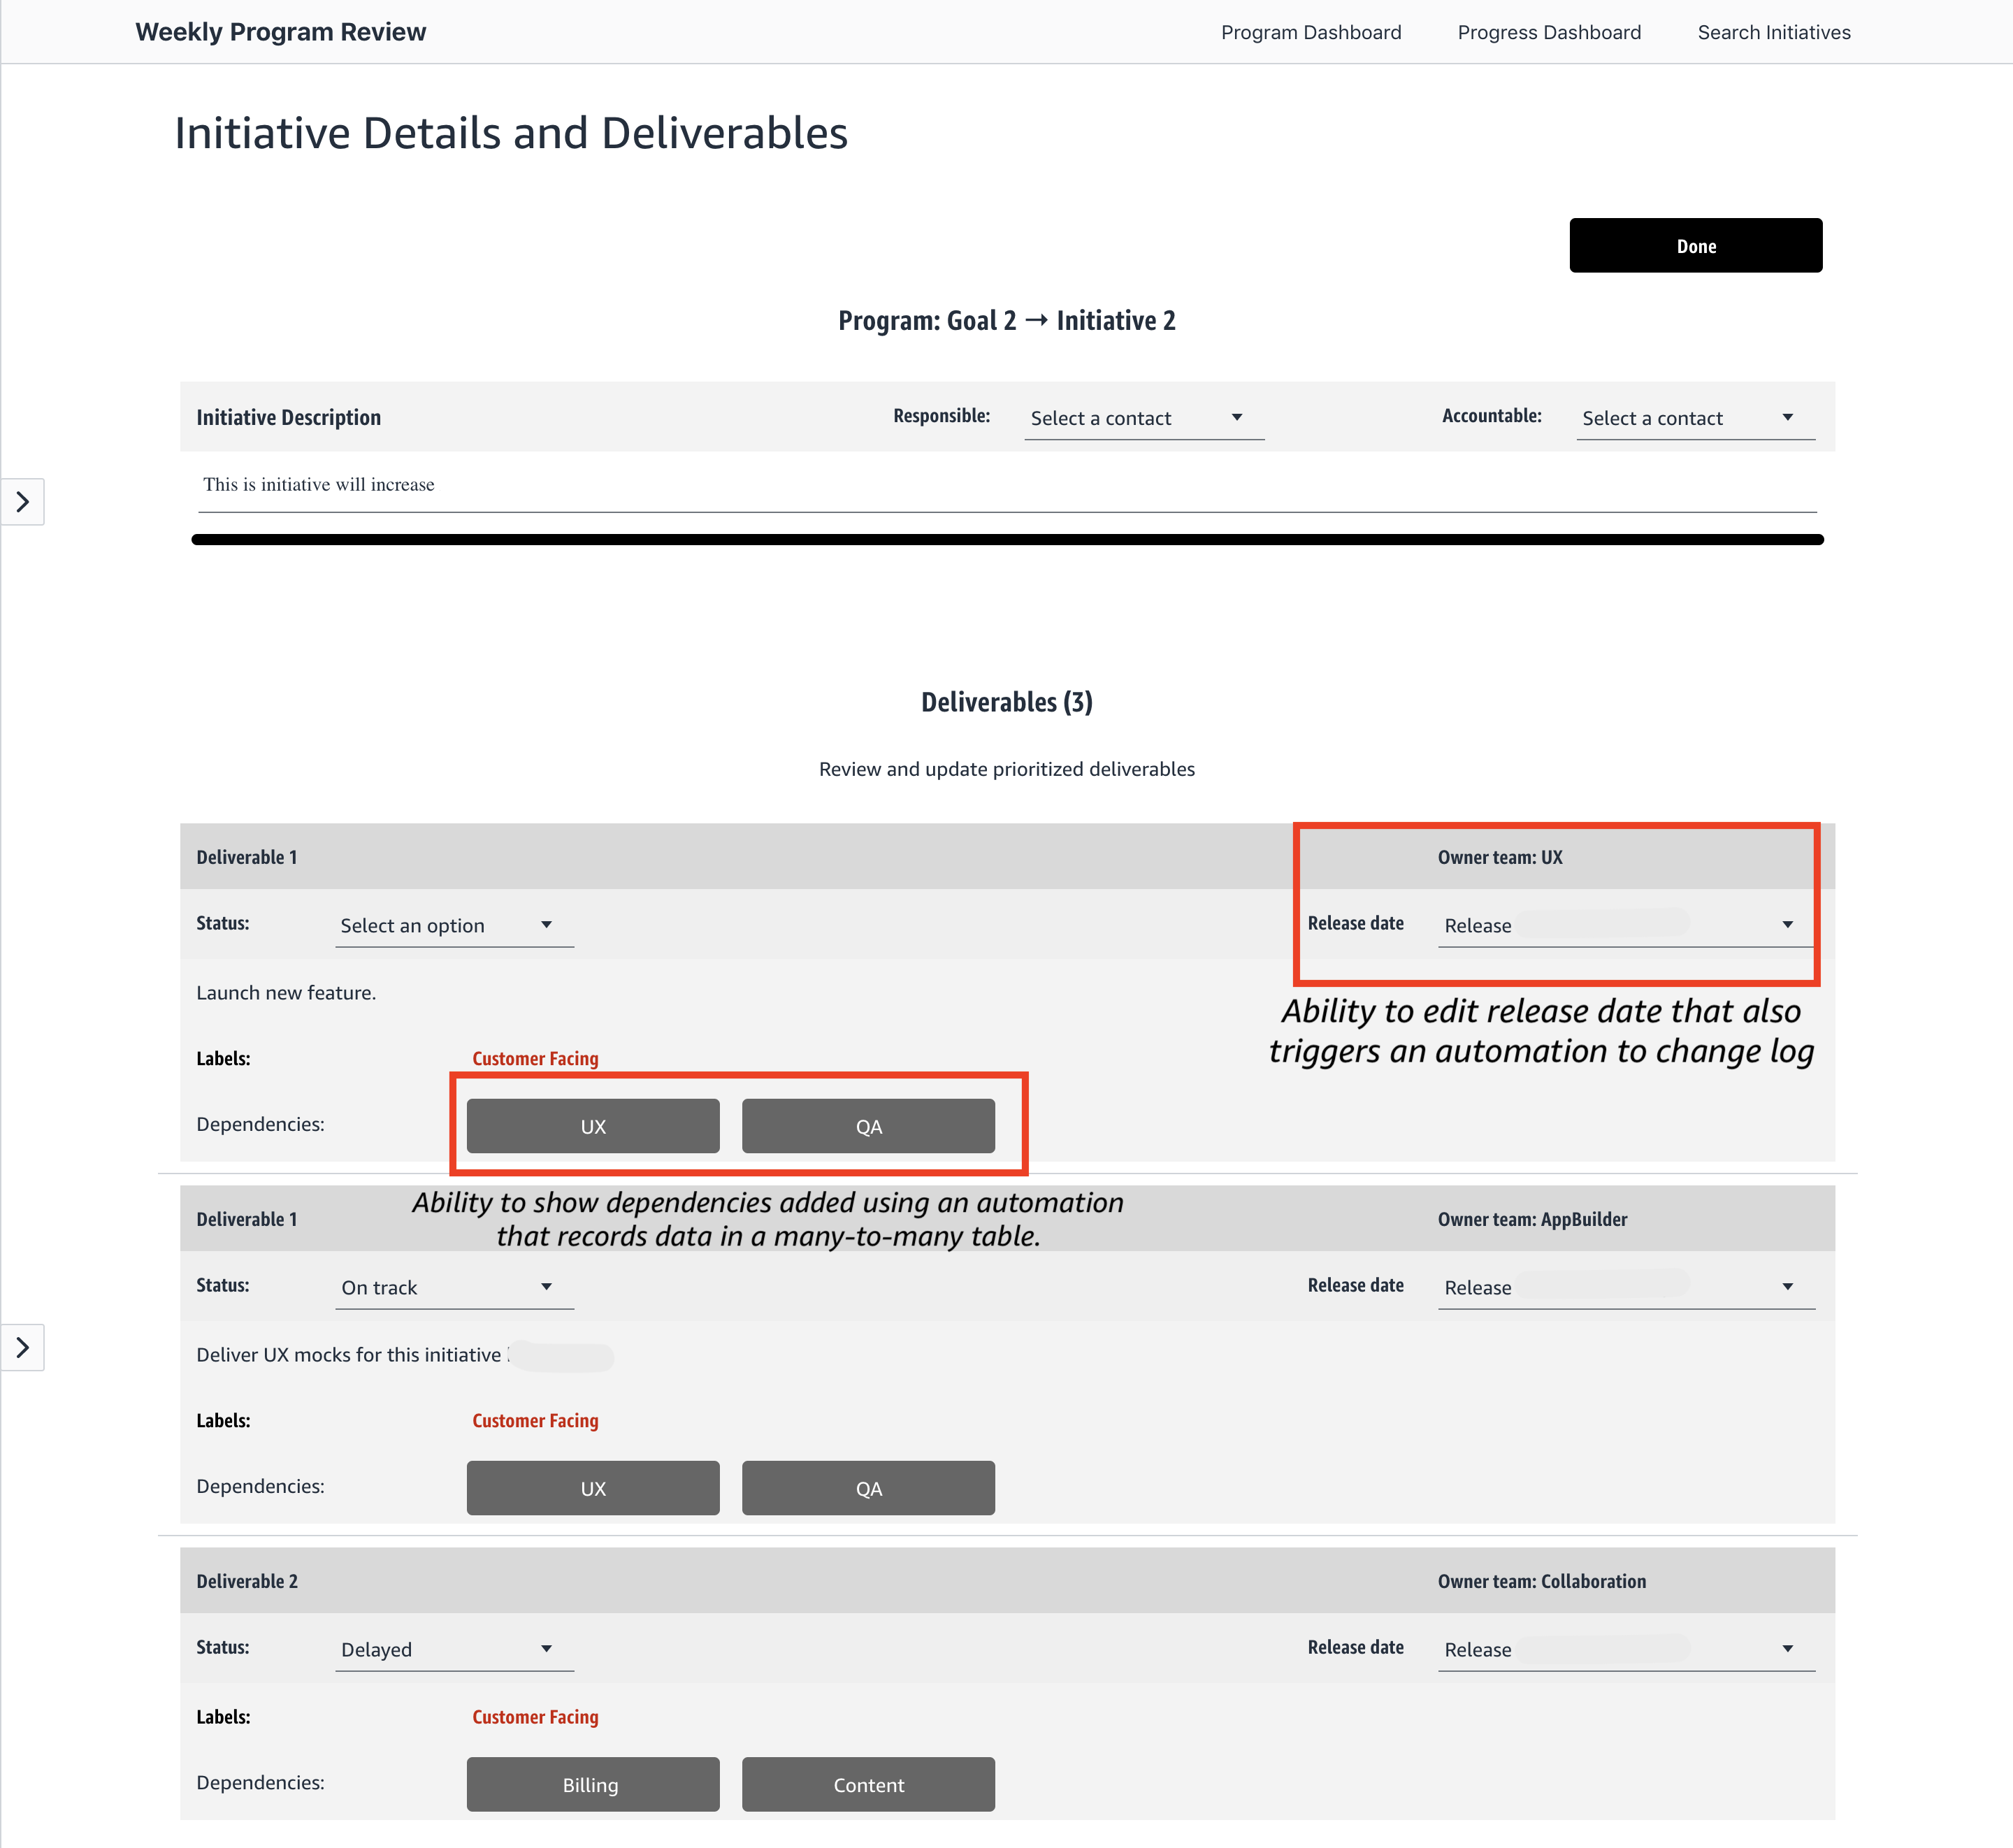
Initiative Detail Page
When a user clicks on an initiative, they’re able to review all smaller size tasks that we call ‘deliverables.' This is the page where a user can update the release date and the status of a deliverable via editable picklists (formatted as Rowlinks in my table). I was able to build a simple “Add a row” automation when a user changes the release date, which allowed me to craft a change log table used to track historical changes in the plan. Moreover, when that happens I also get an email notification on the change so that I’m aware as soon as it happens. This was something I couldn’t think of building into other tools without manual interventions and it’s a dream.
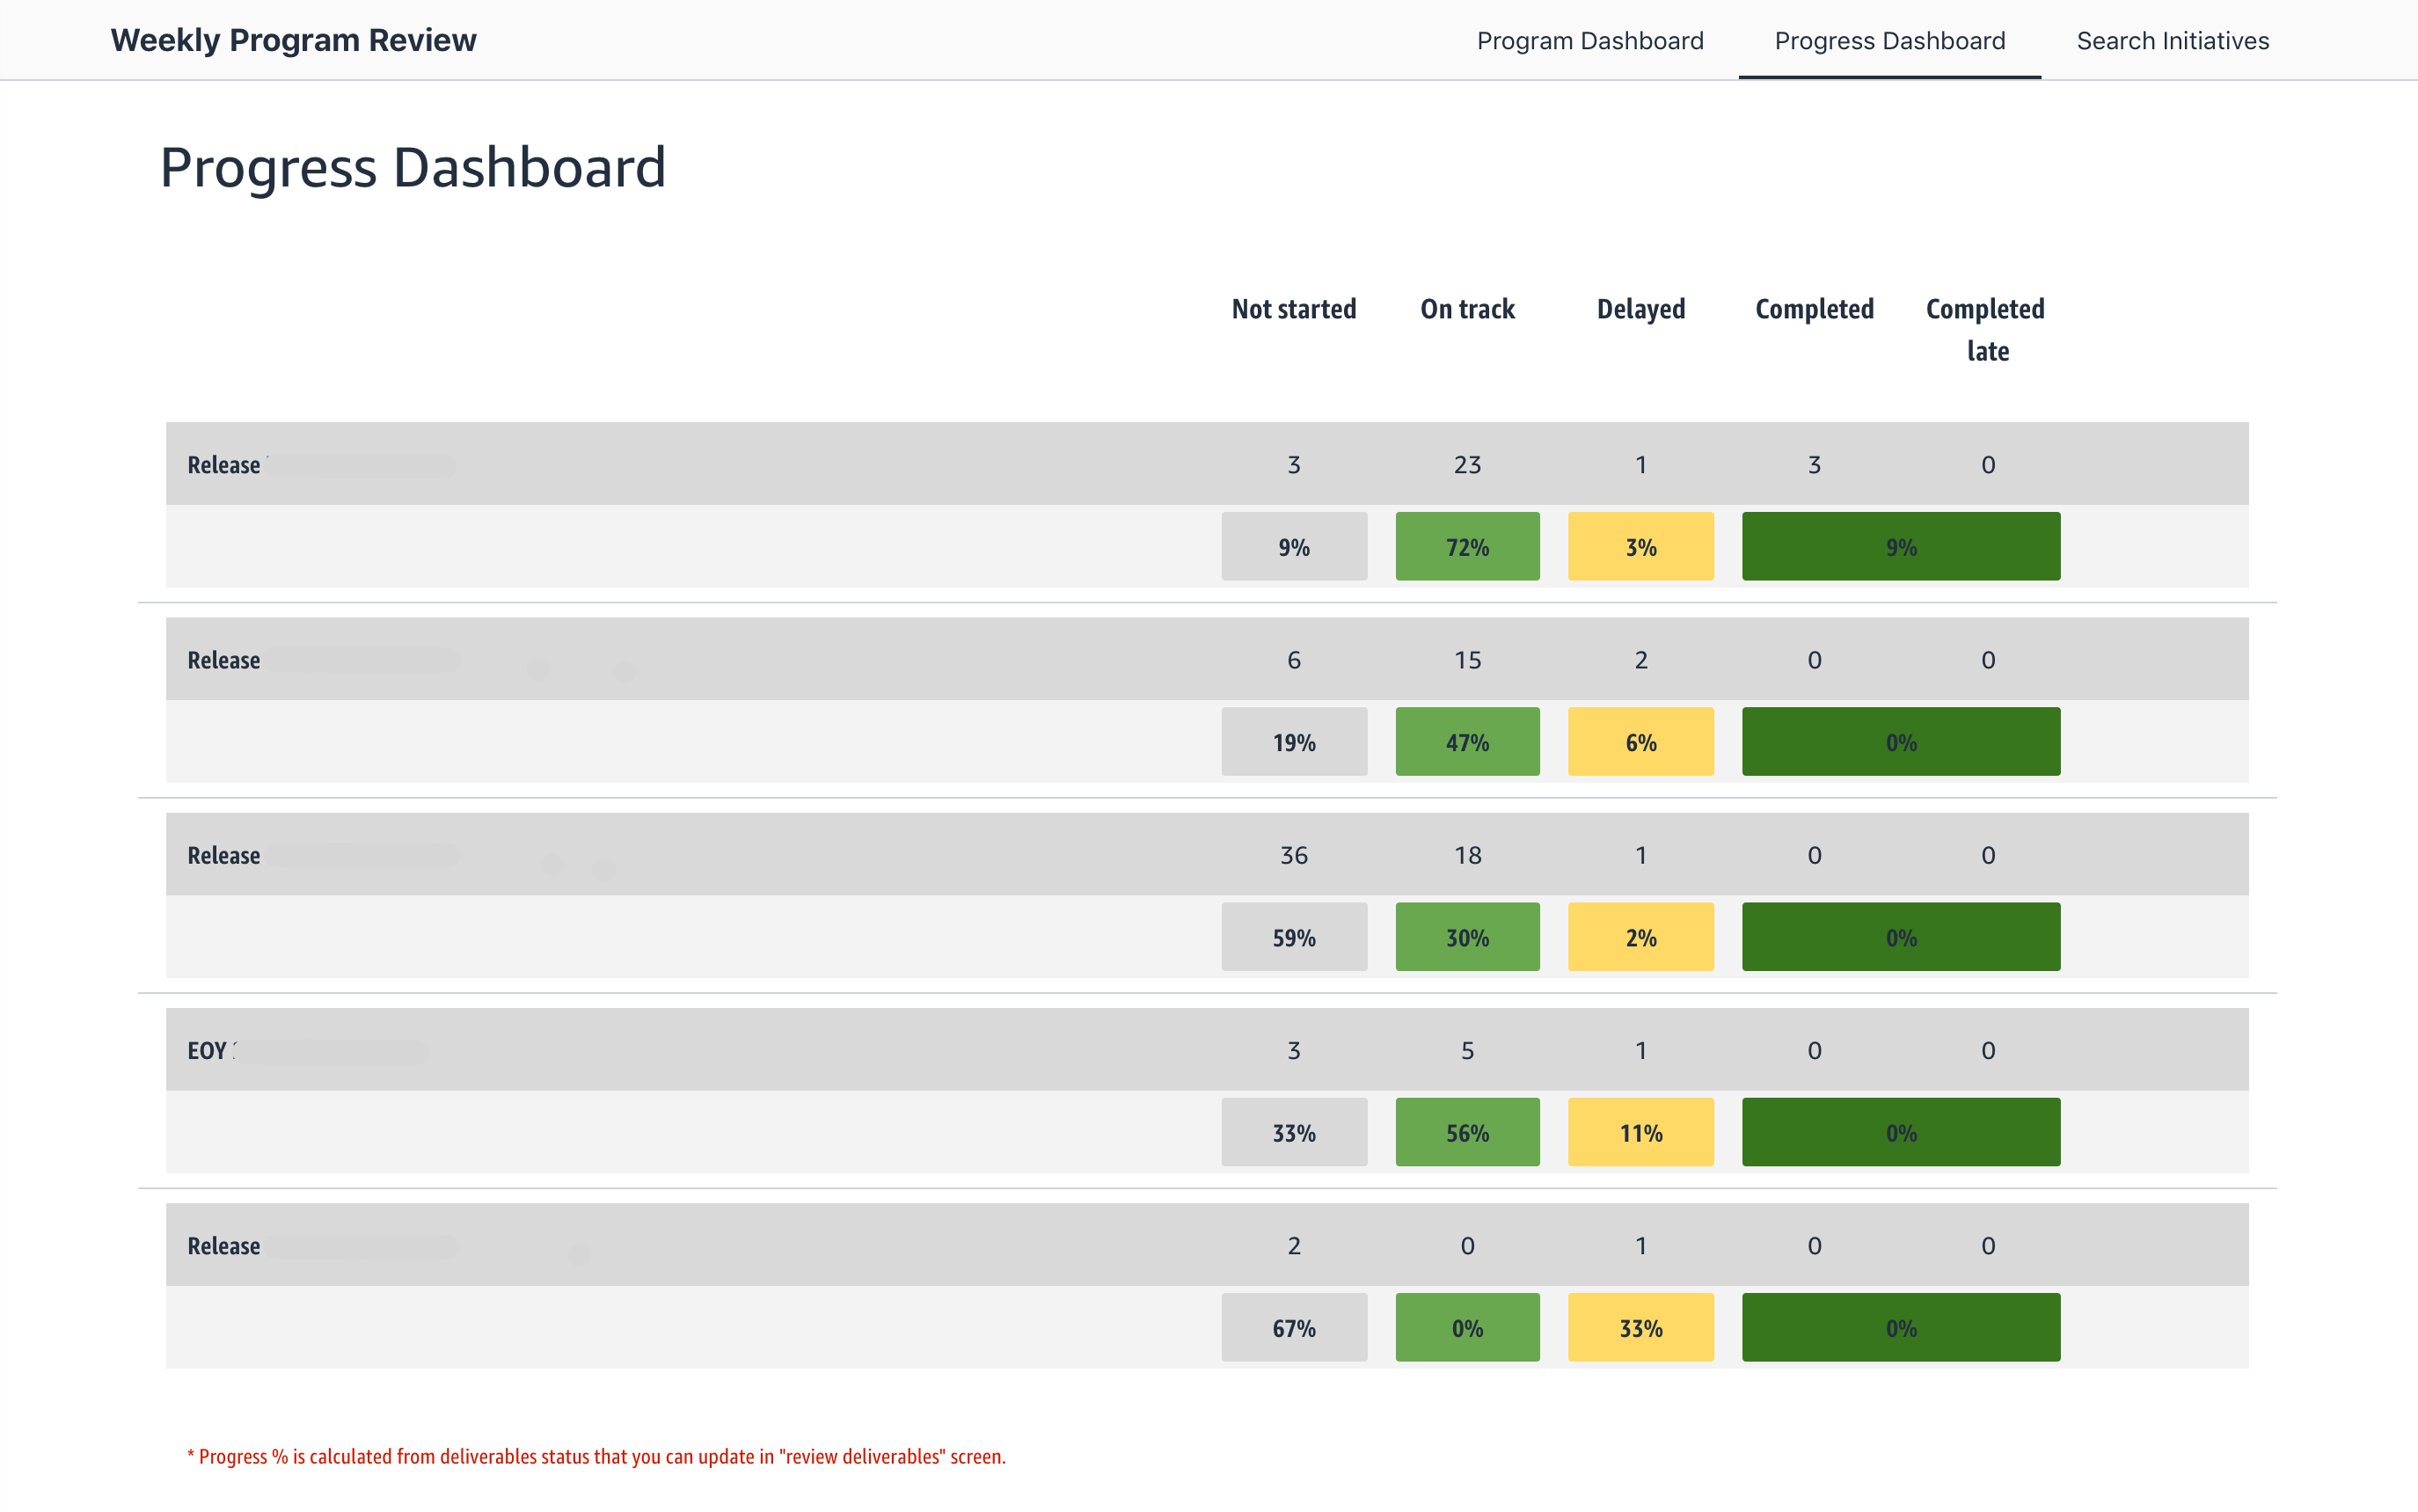
Progress Dashboard
Dashboards are always a fan favorite in Honeycode. The Progress dashboard is a great view to see deliverables organized by timeline, in our case releases, and by status. This is a summary table, where most of the filters are copied using the Save Filter functionality in tables rather than writing the full syntax. Once I had the summary dashboard in place, I added in the simple formula using ROWS(of filters) to calculate the progress ratio. Clicking on each release provides a detailed list view of deliverables with their status.
My Key Learnings
Tip 1: Work backwards
It’s important to note that I didn’t start to build my app by creating the first screen. My weekly review meeting takes an hour and has approximately 40 people in attendance, so it’s a big organizational commitment. I started by thinking what do I want to get out of this weekly meeting? What would I write in the meeting report to reflect how we’re tracking towards our targets? What would one team need to see on another team’s progress and dependencies? What would our customer support and QA team need? What would our curriculum team need in order to decide what they need to work on? In a nutshell, I worked backwards. This video helped me translate my ultimate working backwards vision into app objects and screens.
Tip 2: Don’t rush to learn everything all at once
One of the first things I learned was list-detail-form design pattern and understanding how I can build navigation from screen-to-screen. It might sound pretty basic to some but this concept is completely foreign to others. In my first apps, I relied on shortcuts very often, especially the list shortcuts (Create a List with a Filter) for adding lists on app screens. Even when I found out I made a mistake with a filter, it was easy for me to delete the list and re-do that screen in under a minute. As I made progress, if I needed a custom filter that includes ORDER BY, I used the Save Filter functionality in Tables, and finally I started building filters from scratch following the step-by-step how to for filters here. If you’re a hands-on learner like me, a worthwhile investment of your time is following this tutorial to build a fun app.
Tip 3: Think one-workbook-many apps
You can create as many as apps as you need in a single workbook. This means you invest only once in building your tables and data modeling in table builder. You can then build apps on this workbook with different features and views for different sets of stakeholders. For instance, the Program Review app is a part of the suite of roadmap apps in my workbook. Another key app in this workbook is a Roadmap Planning app, where our organization manages intake and prioritization of initiatives. The Weekly Program Review app is where we monitor and track progress, and finally the Stakeholder View app is how we share our roadmap with external teams—you may see more information on these other apps in the future!
It’s a great feat to be able to build an app without a coding background, see first-hand how it helps with the productivity challenges, and iterate on new features with feedback from my stakeholders.
Not yet a Honeycode Customer? Sign up for our free version here.
I’d love to hear from the audience, what are the key features your organization needs to manage your roadmap? Which features of this app are you curious to learn more about?