Overview
Zapier, Amazon AppFlow, Webhooks, and APIs are the four integration methods that enable you to connect Honeycode to thousands of applications and services that enable workflows that move data between Honeycode and your other work tools (e.g., Salesforce, Marketo, Google Sheets, Slack, Amazon S3, etc.).

You can configure integrations based on events in Honeycode (e.g., a button click, new data added, data deleted, on a fixed schedule etc.); in addition, these integrations can also be triggered when something happens in an external application leading to a change in your Honeycode app.
Getting Started
Accessing the integrations modal
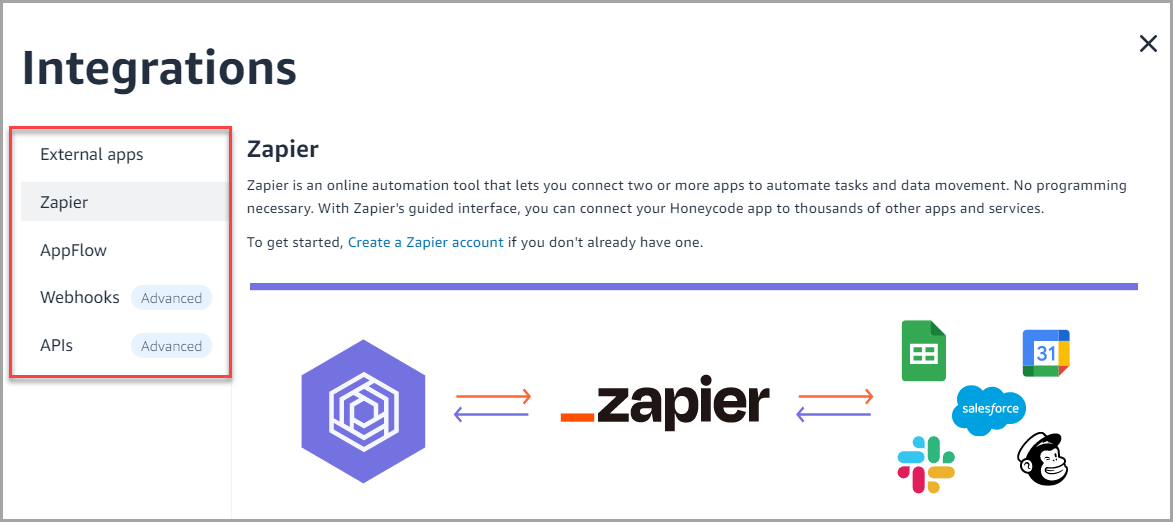
- To access the integrations modal in Honeycode, go to the Properties panel > go to the Data section > select See all integration options.

- In the integrations pop-up modal, navigate through the four different integration types using the left-hand side bar.
- If you receive the following message, contact your team's admin to enable integrations.

Determining which one to use
You might be wondering which integration method is best for your use case. Here are some things to consider.
- Does Zapier or Amazon AppFlow support the integration? If so, these may be easiest to set up with their guided flows and no coding skill requirements.
- Zapier supported applications and services (requires a Zapier account)
- Amazon AppFlow supported applications and services (requires an AWS account)
- If both Zapier and Amazon AppFlow are supported, think about your requirements to determine which one to use:
Requirement Zapier Amazon AppFlow I need to move one row of data at a time. I need to move multiple rows of data at a time. I need Honeycode as the source/trigger for actions and data movement. I need Honeycode as the destination for data movement.
- If Zapier or Amazon AppFlow do not support the integration (e.g., You have a special use case or maybe the application you are trying to connect to is custom/internal) consider using the Webhooks (may require some technical skills) or Honeycode's APIs (requires coding skills).

Zapier
What is Zapier?
Zapier is an online automation tool that connects two or more apps to automate tasks and data movement without needing a developer to build the integration. It's easy enough that anyone can build workflows with just a few clicks.

What are the benefits of using Zapier?
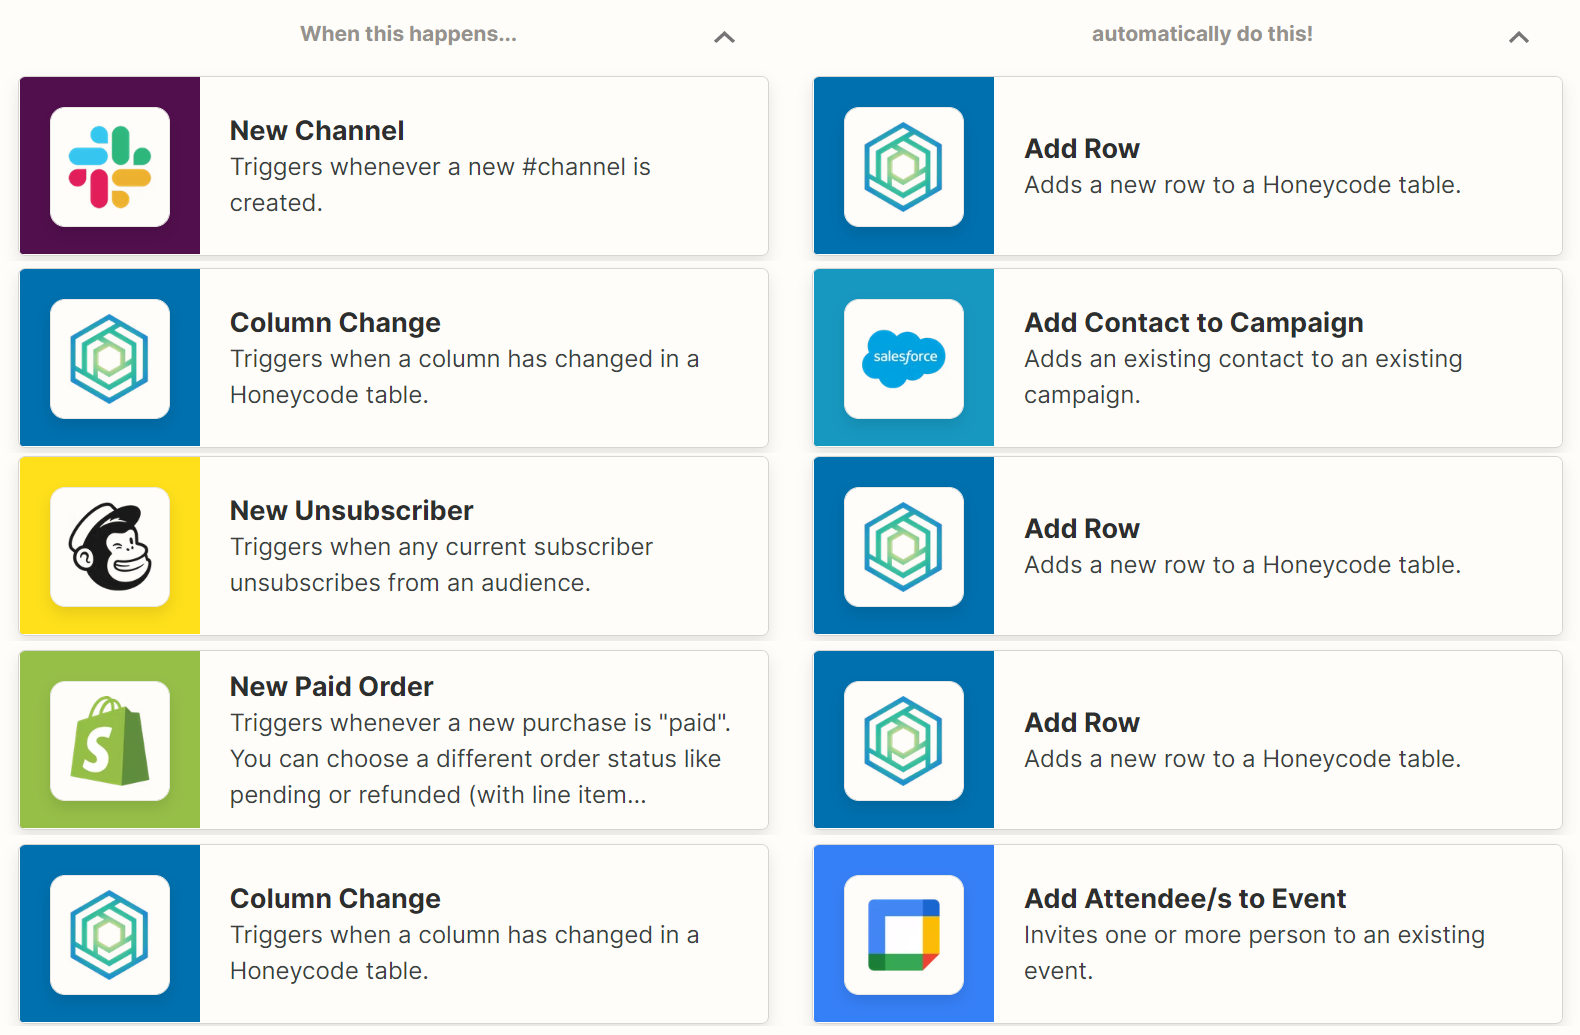
With Zapier, you can connect to thousands of applications and services. No programming is necessary and in just a few clicks, you can set up a fully functional integration between Honeycode and your target service. There are many different types of workflows that you can implement with Honeycode and Zapier. Below are a few ideas:
Zapier terminology
Zap
A Zap is an automated workflow between your apps. For example, you may have a Zap that writes Salesforce data to a Honeycode table. Zaps consist of at least two parts: a trigger and one or more actions.
Trigger
A trigger is the event in an app that starts the Zap. Once you set up a Zap, Zapier will monitor the app for that event. For example, new data is written to Salesforce each time a new record is added, and this could serve as a trigger. Zapier will monitor this for you in Salesforce.
Action
An action is the event that completes the Zap. For example, with the aforementioned Salesforce trigger, a new row of data is written to a Honeycode table, which would be the action.
Task
Each piece of data you run through your Zap counts as a task. That means if your Zap adds 100 rows of data to a Honeycode table, that would count as 100 tasks.
Note: Based on number of zaps, count of steps in each zap, or tasks, you may need a Premium Zapier plan. See here for more details.
Getting started with Zapier
While we do provide high level steps in this article, we recommend Zapier's documentation if you prefer something more thorough:
Zapier's Getting Started Guide
Zapier's Learning Center
To use Zapier, you will need an account with an email address for:
- Honeycode
- Zapier
- The external application or service you want to connect to
Creating a Zap with Honeycode as the trigger
-
Log into Zapier: You will need to create an account if you don't already have one.
-
Authenticate Amazon Honeycode: After authenticating, choose the app's workbook (i.e., the set of tables that power your app) that you want to integrate with.
-
Authenticate External App: Choose and authenticate the external app that you want to integrate Honeycode with (e.g., Google Sheets).
-
Set up the zap: Select the trigger and action across Honeycode and the external app.
-
Test and publish: Test your Zap to make sure it runs the way you expect. If everything looks good, you can turn on the Zap.
Creating a Zap with Honeycode as the action
-
Honeycode set up: Create a Honeycode workbook. Set up the table where you want the data to go.
-
Create the Zap: Go to Zapier and click on the button that says Create a Zap . Give your Zap a name.
-
Set up the trigger: Select the application and follow the steps to configure the trigger.
-
Set up the action: Select Honeycode as the application and follow the steps to configure the actions.
-
Test and run: Test your Zap to make sure it runs the way you expect. If everything looks good, you can turn on the Zap.
Amazon AppFlow
What is Amazon AppFlow?
Amazon AppFlow is a fully-managed integration service that enables you to securely send data one-way from software as a service (SaaS) applications (e.g., Salesforce) and AWS services (e.g., Amazon S3) to Honeycode as a destination.
This will require having an Amazon Web Services (AWS) account.

| Data Source | Amazon AppFlow | Destination |
|---|---|---|
| See the list of apps and services that can be used as a source for integration | → | Honeycode |
What are the benefits of using Amazon AppFlow?
In just a few clicks, you can run data flows at nearly any scale and at the frequency you want: on a schedule, in response to a business event, or on demand. Here are few additional use cases:
-
Keep data in sync: Transfer data from Amazon S3 into Honeycode.
-
Bring data together: Build solutions across multiple applications, such as visualization or analytics.
-
Transfer at scale: Amazon AppFlow lets you transfer hundreds of rows at a time into Honeycode.
-
Integrate securely: With Amazon AppFlow, data is encrypted at rest and in transit, or use AWS PrivateLink for a private data transfer.
Getting started
To see if a service can be used as a source, destination, both, go to the Amazon AppFlow requirements page, select the service, and look at the note at the top. Please note that Honeycode can only be used as a destination.
To use Amazon AppFlow, you will need an Amazon Web Services (AWS) account
Check out the Amazon AppFlow User Guide for complete instructions on how to get set.
Create a flow
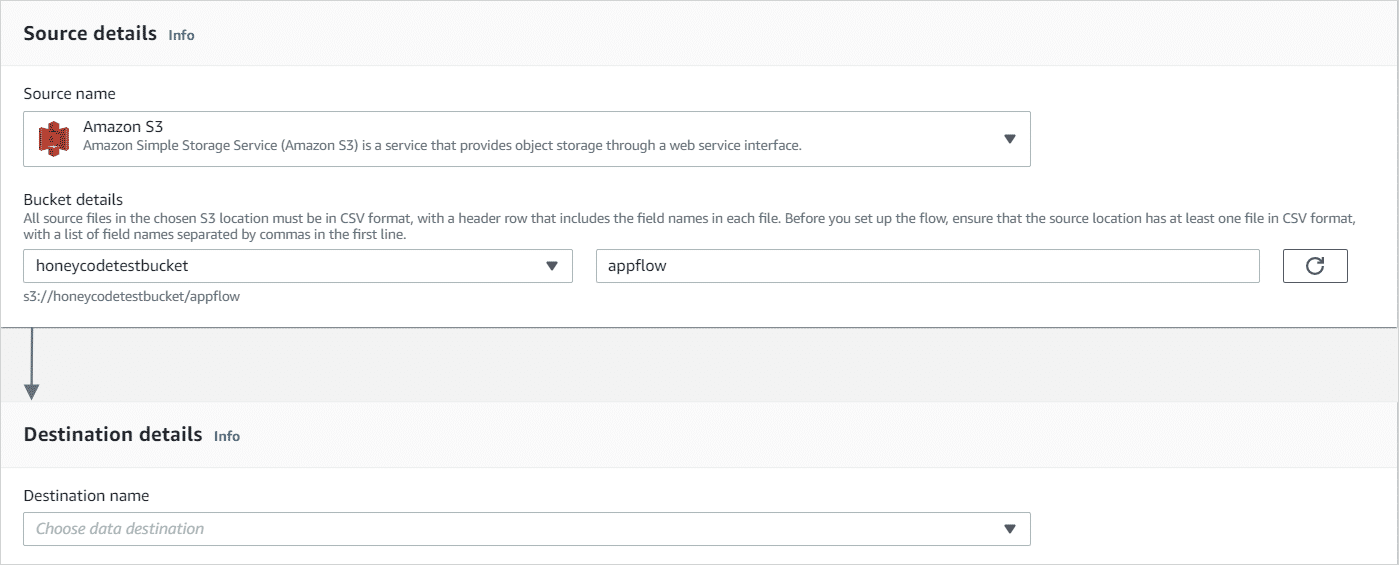
This example covers a flow using Amazon AppFlow to send data from Amazon S3 to Amazon Honeycode.
Amazon S3 → Amazon AppFlow → Amazon Honeycode
-
Check the source configuration requirements: Requirements specify that the source file must be in a csv format with a header row that includes the field names in each file. Requirements for using Amazon S3 as a source.
-
Upload your source file to Amazon S3: Log into your AWS account and upload your file to Amazon S3. Make sure that your file is in csv format with a header row that includes the field names in each file.

- Create your flow in Amazon AppFlow: Go to the Amazon AppFlow homepage in the AWS console and choose the button that says Create Flow . Give your flow a name and then click Next.

- Enter source and destination details: When you select Amazon S3, you will be prompted to select a bucket. Make sure that your csv file is already uploaded to this bucket.
-
Choose the flow trigger: Amazon AppFlow provides you with the following three options:
- Run on demand: You manually run the flow each time you want to transfer data. You do this by pressing the Run Flow button on the Flow Details page.
- Run flow on schedule: You provide a date and time, and specify a repeat frequency, if applicable.
- Run flow on event: You configure an event that will initiate the flow. This option is available for source applications that provide change events.
For this example, select Run on demand and click Next.

-
Map data fields: In this step, you match the fields from your source file to specific columns in your Honeycode table. Amazon AppFlow provides you with several options for mapping:
- Mapping method: You can do this manually or by uploading a csv file.
- Source to destination field mapping: Mapping fields directly means that the source data transfers directly to the destination with no modification. You can also choose to map fields with formulas.
- You also have options for validating data, and applying filters.
For this step, select Manually map fields and then select Map fields directly . You will then be prompted to add filters. You can skip the filter step and proceed to review and create.

- Run the flow: Navigate through the remaining screens until you reach the review and create screen. Click the button that says Create Flow . In next screen, you see the details of the flow that you just created. Click the Run Flow button on the top right of the screen to see your flow in action.

- Check the results: Now go back to Honeycode, and check out your table. You can see that the data from the csv file is now added to your Honeycode table.
Amazon AppFlow Best Practices
Best practice 1: Separate connection for each Flow
While Amazon AppFlows can share connections to Honeycode it is recommended to create unique connections for each Flow. For example, when importing a Customers table, and an Orders table from S3, we recommend creating Honeycode_Customers_Import_connection, and Honeycode_Orders_Import_connection connections for the two import flows, Customer_Flow and Orders_Flow, respectively. It does not matter if Customers and Orders come from the same or different data sources; but it is recommended that you create different connections to Honeycode for each Flow.
This is particularly helpful if you see: “Authentication Error with status code 403” errors in your flow executions.
Best practice 2: Space out Flow runtimes
If you need to run multiple scheduled flows, we recommend you do not run them at the exact same time; instead separate them by 15 minutes or more. Running flows one after the other, rather than in parallel, avoids timeouts. If you are seeing 504 errors you should schedule the Flows to run at least 15 minutes after the previous one finishes, or give them ample time between starts (for example morning vs. evening, or 8AM and 10AM every morning).
Best practice 3: Use Owner or Collaborator users for Amazon AppFlow connections to Honeycode
When creating an Amazon AppFlow connection to Honeycode please use a username that has an Owner or Collaborator role in the workbook you are trying to import data into; the simplest way to do this is to be logged into Honeycode with a user who is the Owner or Collaborator in the workbook you are trying to import into.
Please note that this is not an Administrator for the whole team, but specifically Owner or Collaborator on a given workbook. If you create the workbook yourself you are automatically an Owner, and if you are invited to the workbook (not just the app) you will be given the Collaborator role. The only difference between the two is that Collaborator cannot delete the workbook, whereas the Owner can. You can read more about roles and workbook/app sharing in this Teams & Billing article.
Best practice 4: Keep imports under 500 records at a time
We recommend limiting the number of rows Amazon AppFlow imports into Honeycode to 500 or less rows at a time. You can do this by setting filters or smaller time ranges. This recommendation helps because it avoids over running the write buffer allocated to each application in Honeycode.
Best practice 5: Avoid sheet automations after imports
While it is possible to run an automation immediately after an imported row has been appended/added to a table, it is recommended that “processing” automations should be done later, after the import has completed. For example, you would want to let the import job write all 300 rows into an import table before you run an automation to process the import and update the relevant/related tables. To do this, you can add an ImportRowProcessed (date and time) column to your ImportTemp table; this column remains blank during the import. Later in the day, another automation updates the relevant tables and updates the ImportRowProcessed field. Perhaps have another automation that runs once a week and deletes all the records in the ImportTemp table with ImportRowProcessed > 7 days in the past - to clean up your import table.
Best practice 6: Run imports at night
Imports, just like regular data entry by humans, make API calls against the Honeycode database. Therefore, we recommend scheduling imports at night, or when regular users are not active in the application. When imports don’t compete for API calls with your regular users, the apps will be more responsive for your app users.
How do I get help
Following these recommendation will help reduce errors and help your applications perform better.
Feel free to ask questions in the Honeycde Community
If you are an AWS Support customer, you can also raise a case in the AWS Support Console.
Webhooks
What is a webhook?
A webhook is a way to make online services and applications communicate with each other. They can be used to automatically move data from one place to another when something happens.
You can also think of webhooks like messages that are sent between applications. And in Honeycode, whenever an automation occurs (e.g., something in an app or a table changes), you can add a webhook to move the data from Honeycode to another online service.
For example, let's say you have a Honeycode workbook automation that records new customer orders for gardening supplies. This automation writes a new row of data to one of your Honeycode tables for every new order. Each time this happens, you want two things to automatically send to another online application:
- The column data that contains the gardening supply that was ordered.
- The column data that contains the employee at your company that placed the order.
In this example, the application you want to send the Honeycode data to isn't supported by Zapier because it was built internally by your IT department; it does, however, have the ability to receive webhook calls.
In order to move the data from Honeycode to your internal application each time this automation occurs, there are a few things you will need to set this webhook up:
-
Webhook URL: The destination that you want to send the Honeycode data to (i.e., the URL of the internal application built by your IT department).
-
Payload value: The payload value is the message or data (i.e., the column data in our example) that is being sent from Honeycode to the destination. For our example we will use:
-
=[Order detail]This is the column containing the gardening supply that was ordered (e.g., fertlizer or a shovel) -
=$[Sys_User]This is the name of the employee at your company who submitted the new order using the Honeycode app
-
Builder tip: You can get creative with payload values and write expressions for more complex data and use functions like
FindRow(to look up something and send to the destination) orFilter(to send a count of something to the destination).
-
Payload key: This can be any word. Keep in mind that this is what will appear in the destination URL. Think of it like the column name for the payload value that you are sending to your internal application. Going off the example above, the following could serve as two corresponding payload keys:
Gardening supply orderedEmployee name
-
HTTP headers (optional): HTTP headers can be used for different things. For example, you can use them for authentication, or maybe you have only one destination and several applications sending webhooks to the destination, and you want to specify a custom HTTP header to know the application this webhook was sent to.
Steps
- Webhooks require a Honeycode button click to act as a trigger. In the properties panel, select an existing or new button's ellipsis > select + Add Step > select Webhook.

- Enter the Webhook URL, payload value, and payload key.

- (Optional) Enter HTTP Header values and keys.

-
Select save.
-
Check your destination after the automation runs to see if the webhook works.
APIs
Honeycode has multiple APIs, that let you programmatically interact with Honeycode apps:
- BatchCreateTableRows
- BatchDeleteTableRows
- BatchUpdateTableRows
- BatchUpsertTableRows
- DescribeTableDataImportJob
- ListTableColumns
- ListTableRows
- ListTables
- ListTagsForResource
- QueryTableRows
- StartTableDataImportJob
- TagResource
- UntagResource
Unsupported APIs: While it is always possible to bypass the UI of any web application and use the internal APIs, this practice is discouraged since these APIs are not supported for external use, and can and will change as Honeycode develops.
Any approach that embeds login and password information in a tool opens a security risk.
Team controls
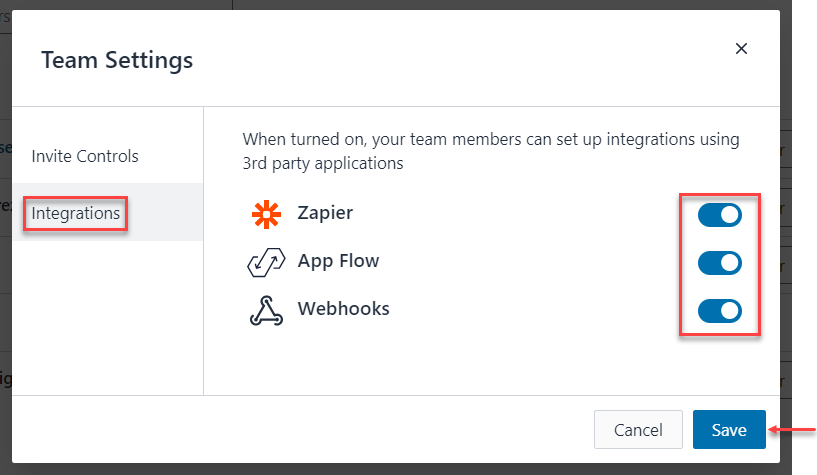
If you’re a Honeycode team admin, you can enable or disable your team members from connecting with Zapier, Amazon AppFlow, Webhooks, or any other integrations we build in the future.
Steps
If your team receives the following message when trying to access the integrations modal, you will need to switch the settings.
-
Go the Dashboard's left panel > select the team > select the gear icon.
-
On the Team Settings pop-up modal, use the toggles to enable the integrations of your choosing > select Save.
Note: this may look different if you are an SSO user, as you will not see the Invite Controls options.
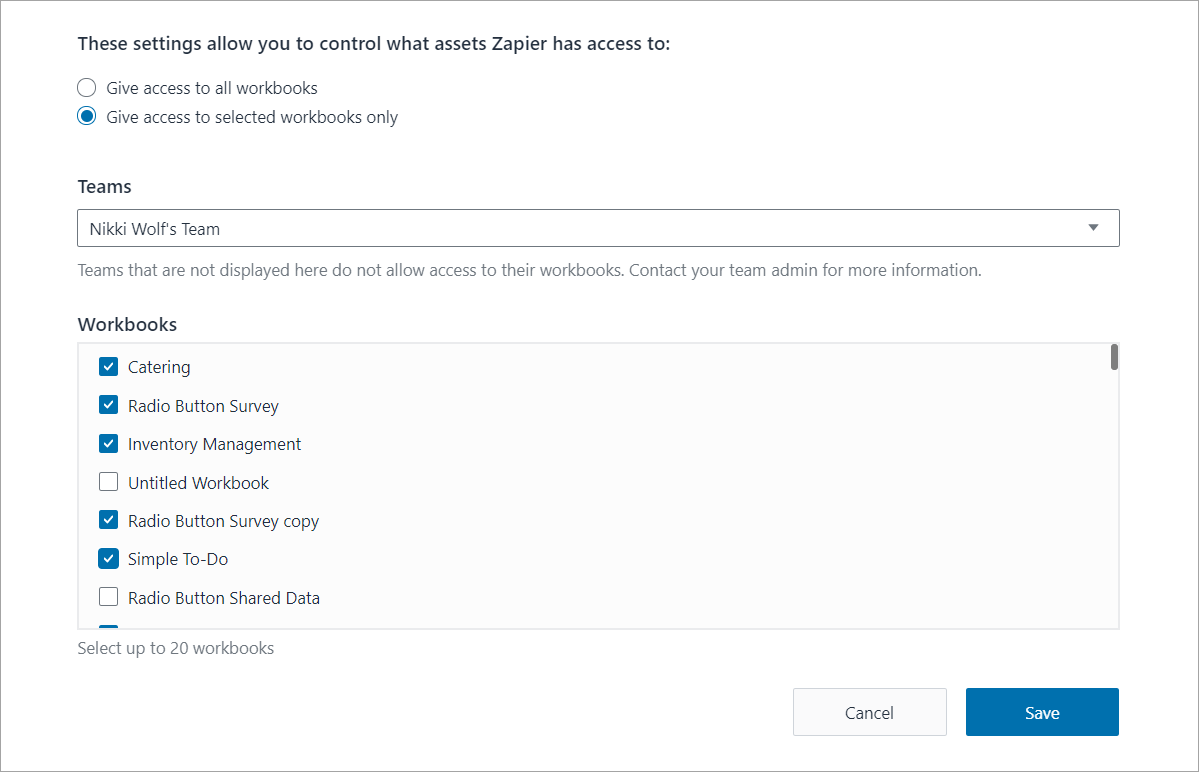
Builder tip: When giving Zapier access to Honeycode, you can choose individual workbooks, as shown in the image of the Zapier settings modal below. This can be helpful in the event there are only certain workbooks that need integration access.
FAQ
1. Are there limits for Zapier, Amazon AppFlow, and APIs?
Currently, these are the limits (subject to change):
- Throttling will be per user who has authenticated with Zapier or Amazon AppFlow; for the APIs it's per AWS Account.
- StartTableDataImportJob: 1 tps rate/5 tps burst
- DescribeTableDataImportJob: 5 tps rate/25 tps burst
- ListWorkbooks, ListTables, QueryTableRows and ListTableRows: 25 tps rate/50 tps burst
- CreateTableRows, UpdateTableRows, DeleteTableRows, UpsertTableRows: 5 tps rate/25 tps burst
3. Can I use Zapier, Amazon AppFlow, and Webhooks if I am using single sign-on (SSO)?
Yes, we do support the use of Zapier, Amazon AppFlow, Webhooks, and future integrations if you are using SSO.
4. As a Honeycode team admin, when I turn a 3rd party integration OFF, what can I expect to happen?
- If there are zaps, flows, or other integrations currently on, you can expect them to stop working after a few minutes.
- If there are zaps, flows, or other integrations currently configured, you can expect workbook owner or collaborator to be able to see that integrations were disabled in runtime logs.
- If there are zaps, flows, or other integrations currently configured, you can expect builders to see that it’s not functioning, and delete the configuration if they so desire.
5. As a Honeycode team admin, when I turn a 3rd party integration ON, what can I expect to happen?
- If there were existing zaps, flows, or other integrations that were paused because an admin had turned team access off, you can now expect them to work normally.
- If there were existing zaps, flows, or other integrations that were paused because an admin had turned team access off, you can now expect builders to see that their configuration is in a functioning state.
6. What is the default state of integrations when a new team is created?
- For non-SSO teams, they are ON by default.
- For SSO teams, they are OFF by default.
7. Will integration activity be recorded in CloudTrail?
When API activity occurs in Amazon Honeycode apps, the activity is recorded in a CloudTrail event. Both Zapier and Amazon AppFlow use Honeycode APIs (using OAuth authentication), so these activities are also recorded as CloudTrail events. You can view, search, and download recent events in your AWS account across API calls and your usage from Zapier or Amazon AppFlow.