Stay in sync
Want to make your apps more dynamic and responsive to your team’s needs? Help your team get things done, from data updates to notifications, all from your apps.
Apps actions and automations can accomplish the same end goals as table automations—the biggest difference is that they’re triggered by app users instead of deadlines or table data. In Honeycode these actions can:
- Navigate users between screens
- Update their current screen’s data
- Trigger custom automations
App actions & objects
App users trigger actions with mouse clicks on web and taps on mobile apps. App actions can be configured for the following objects:
- Buttons
- Content boxes
- Blocks
- Lists
Navigate to new screen
Use this anytime you want app users to go from one screen to another.
-
Select an app object.
-
Click on the Actions tab in the properties panel.
-
In the “Quick Actions” section, select Navigate to New Screen .
Builder's tip: The “Actions” tab is organized in two sections: “Automations” are custom automations you can build from scratch. “Quick Actions” are common app-focused actions like navigating between or updating screens.
- Select a screen from the picklist. You can send users to any screen in your app, the previous screen they were on, or you can choose to create a new screen.

-
(Optional) Once you select a destination screen, you can also choose to pass certain user inputs from one screen to the next, these inputs are called variable data cells.
-
Click on View app to test your navigation on your web app.
Update current screen
Use this when you want a screen to display data specific to the app user and their actions.
One example is with a form. A form uses variables that can display a default value. Let’s say an input field shows the default text “Enter task description.” Once the user enters a description you can use “update current screen” to clear out the default text and show the description entered.
Another scenario is if you want to let app users cycle through a series of detail screens. You can use the variable $[InputRow] to display a different table row’s data.
-
Select an object.
-
Click on the Actions tab in the properties panel.
-
In the “Quick Actions” section, select Update current screen.
- Click Set variable and add the variable data cells that should be updated after the app user taps on the object.

-
Configure the variable data cell. Only the variables on the current screen will be configurable.
-
Click on View app to test your navigation on your web app.
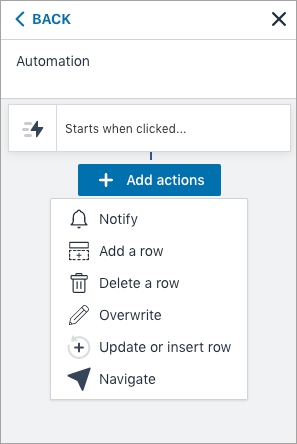
Create a custom automation
Use this when you want app users to trigger more complex behaviors, including updating data and sending email notifications and in-app notifications. See Triggers & Actions to learn more.
-
Select an object.
-
Click on the Actions tab in the properties panel.
-
Click Create an automation . If the object already has an automation, click “Edit automation.”
-
Click +Add actions and select the actions you’d like to trigger when the app user clicks or tabs on the object.
| Was this article helpful? |
|---|
- Yes
- No
0 voters