5 ways to secure app data
Often, you’ll want your app users to see only specific content. For example, a sales manager may be allowed to see only lead gens for their region. Or, you may want Mateo to see only their personal information, not Arnav’s, too.
Honeycode sends only the info you specify to app users’ devices; this allows you to make sure your data is safe and secure. There are several ways you can maintain data security, ranging from super simple to more advanced.
Visibility is not a security feature
Honeycode mobile and web apps hide objects from the app display. However, data that is hidden is still sent to the app. Visibility should not be used as a security feature
1. Only add shareable data
Builder skills: Add data to app
Only add data to your app that can be shared with users. Your app users never have access to data that isn’t in the app.
For example, imagine you want to create a team directory app whose data come from a table that contains each team member’s name, location, and work email — but that data source also includes their SSN and salary.

The last two are clearly sensitive and can’t be shared. How do you make sure that info is secure? It’s simple, don’t add it to your app.
Builder tip: The way to share is by adding individuals to a team. Once they are in the team, either as an admin or a member, then you can share the app with them. Currently, it is not possible to share with other individuals outside of the team, such as with the public.
2. Use a list filter
For lists, you may limit which list items, aka rows from your table, are accessible to app users by adding a filter.
Let’s say you have a table of budget items for the year, with a column for each quarter, and you want app users to access only the budget items for Q3.
In your app, you would add a list to display data from the table. By default, the budget items from Q1-Q4 would show. However, you can limit the rows to budget items from Q3 by using the FILTER function in the list source.

In the example we use the formula:
=FILTER(Budget,”Budget[Quarter]=%”,”Q3”)
This filters the Quarter column in the Budget table to return only items from the third quarter; only these items are sent to users’ apps. Learn more about Honeycode syntax.
Note: To control the data sent to user mobile devices, make sure to use a filter formula as your list source. Allowing users themselves to filter content does not limit data sent to their app.
3. Personalize list data
Personalization is a feature that allows you to limit what an app user sees to only items that are associated with them.
For example, let’s say you have a table that includes all sales accounts, and each sales account is owned by one account rep. You want to make sure that only the account owner has access to the account details.
Builder tip: Some table prep is needed! For this to work, your data table must contain a column of team members that are formatted as contacts.
To do this in Builder, we’ll simply select the list and in the properties panel under “Personalization,” we’ll add the “Account Rep” column. Doing so limits the table rows to those that include the app user in the personalization column. As a result, only data associated with an app user is sent to their app.

4. Secure the detail screen
While methods two and three focus on ways to secure data in lists, this method works for a detail screen.
Say your app’s home screen shows a list of sales accounts. Users can tap on an account and go to a detail screen to see more. However, because closed accounts are locked, you only want users to be able to view and edit open accounts.
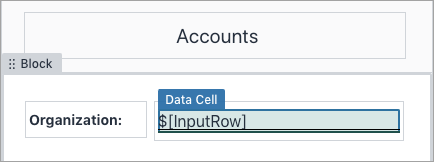
Let’s look at the detail screen. In the example, the detail screen is constructed of two blocks:
- A block with with a variable data cell formatted as a picklist
- A block that displays data from the row specified by the variable
The data cell below is named InputRow. Typically, this data cell is set to display the list item the user viewed before navigating to the detail screen.
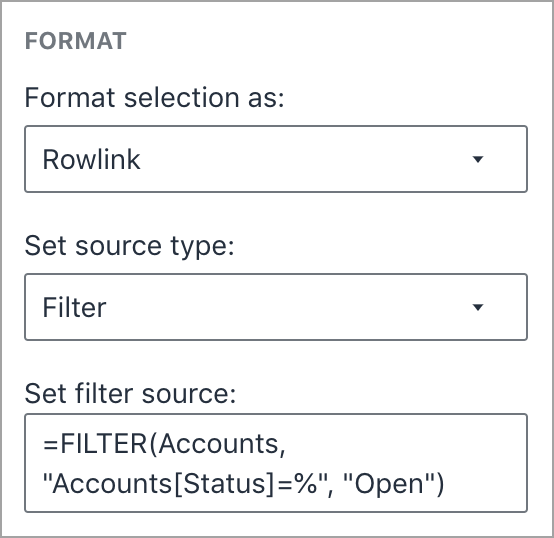
The data cell is formatted as a rowlink and set to “Filter”as the source type. A FILTER formula is used to limit the table rows, in this case, the accounts displayed, to those that satisfy the filter condition, “Open.”

In this example we use the formula:
=FILTER(Accounts, "Accounts[Status]=%", "Open")
As a result, app users will not be able to view data from rows that don’t meet the filter requirements.
Understanding variable data cells can be tricky. Let’s do a quick recap of what’s going on when you use rowlinks and filters to secure the detail screen.
- The user’s mobile device (the client) specifies the row being viewed in the app
- The value of the row being viewed is the variable $[InputRow]
- Honeycode (the service) returns the row details and displays them in the second block
To restrict access to data in a detail screen, make sure that the data cell is formatted as a rowlink, the source is set to filter, and the filter source is a formula with a condition.
5. Use system variables
System variables are preconfigured Honeycode variables that can be referenced in app formulas. $[SYS_USER] returns the active app user's contact.
Let’s say you are in charge of expenses. You have a group of managers able to approve expenses for their team. You want the managers to be able to see a list of any expenses awaiting their approval. You’d start with a table of expenses; that table should include a column called “Approver” that’s formatted as contacts.
In Builder, add a list to your app. Click on the list and in the properties panel, use a FILTER formula as the list source. Using $[SYS_USER] you can filter the expenses table to show only expenses awaiting approval by the manager using the app.
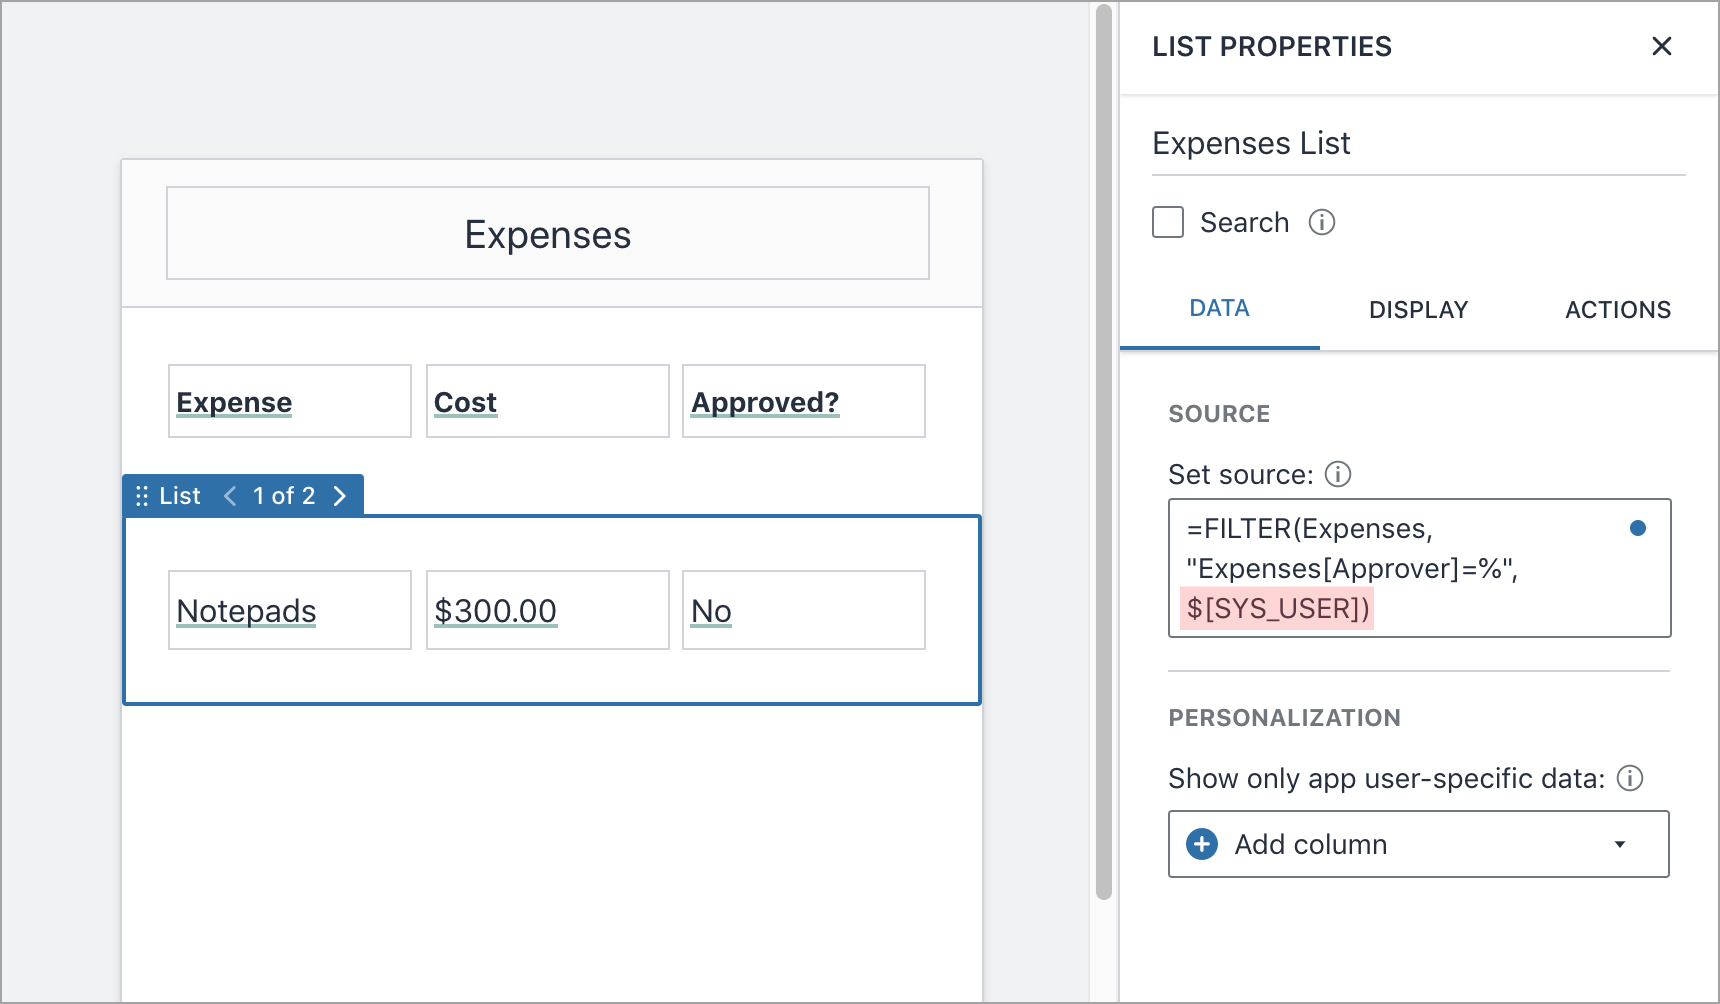
In this example we use the formula:
=FILTER(Expenses, "Expenses[Approver]=%", $[SYS_USER])
As a result, only table rows that include the app user in the "Approver" column can be accessed.
Editability and data security
You can also specify when app users can—or can’t—update data. This feature applies to data cells; you can find it in “Data” tab of the properties panel. When you make data cells editable app users can change data, which live updates your tables.

If you don’t want to let users update data, make sure your data cell is not marked editable.
Another instance that allows users to edit data in tables is when specified in an app automation. For example, if a button submits a form and adds a new row of data. All other non-editable data is read-only.
| Was this article helpful? |
|---|
- Yes
- No
0 voters